This is something a little bit different, as this post is authored by Jnicho from The Reef Tank Online Community. Jeff has been keeping aquariums for 25 years, and maintains a beautifully aquascaped reef tank. Read more about Jeff’s background here.
My general thoughts on aquascaping are pretty simple and can be summed up in two general categories. First, less is more. Second, keep it natural.
Let’s take a more in depth look at these concepts. First, keeping it natural is pretty cut and dry. I like for my tanks to mimic the natural environment of their inhabitants. To each his own I suppose, but you will never find a cheesy sunken ship, Chinese pagoda or no fishing sign in any of my tanks. Beyond that, in reef aquaria it’s important to use items made of materials naturally found on the reef or in the ocean. Other materials often have compounds in them that can cause problems or even kill livestock.
For many years in the reef hobby it was believed that you needed 1 ½ – 2 pounds of live rock per gallon of tank size. If you were going to cram that much rock into most tanks you didn’t have many options on how you could do it. The generally accepted approach was to build a strong base of larger rocks on the bottom with smaller rocks on top. In most cases what you ended up with was a solid wall of rocks across the entire width of the aquarium.
Since the rock work was often leaned against the back pane of the tank, this created a sloped look. It didn’t yield an especially natural look, and especially once you started to place corals on it, it become what I’ve best heard described as “the fruit stand look”. These days it’s been found that adequate biological filtration can be achieved using far less rock, giving much greater options on how it can be arranged.
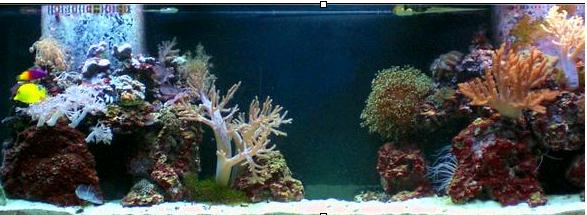
As an example my 125-gallon reef tank has no more than 90 pounds of live rock in it, and maintains undetectable levels of the “bad” stuff. Live rock selection is an entire topic of its own so I won’t get too involved with that here, but I would like to point out that light, very porous rock is the key in using a smaller amount.
There are some different approaches to preparing the tank before you start aquascaping depending on whether you have a substrate or a bare bottom, you want to use rock lifts, etc. I view these more as a choice of husbandry styles; so again, I’m not going to discuss them in depth here. For what it’s worth, I personally choose a moderately deep bed of fine sand and no type of rock lifts or supports in my own tanks.
So, here is what I view as the benefits of this approach. First and most simply, I think using less rock looks better and more natural in most cases. It allows for more natural placement of corals and other livestock, and allows more swimming area for fish. When placing and arranging rock work in the tank, I look for three things.
- Does it look aesthetically pleasing?
- Is it open, leaving as much space as possible?
- Is it secure?
OK, so item one is pretty straightforward. When you look at the tank does the rockwork look natural and pleasing to your eye? One thing I find really helpful when setting up a tank is to look at lots of pictures of other tanks or even pictures of natural reefs. Save the ones that you think look nice so that you can identify a general trend of what you seem to like. Some people may actually like the “fruit stand” look; others may like the look of a trench, while still others may want to try to create a biotope that recreates a specific part of the reef.
I find that randomness often helps achieve the goal of looking natural. Use a variety of sizes and shapes of rock. Also create as many open caves and nooks between the rocks as possible (this also tends to make a more natural environment for fish and other animals). Try to avoid horizontal or vertical lines. Nature seldom runs in straight lines. Horizontal “shelves” or “bridges” are a pet peeve of mine. Under the right circumstances they can look cool. More often than not they end up looking unnatural, especial if used to display corals as if they were in a store for sale. Randomness is also important when placing corals. Varying the amount of space between specimens tends to yield a more natural look.
Item two, keeping it open. Some of this goes back to looking natural. Natural reefs are made up of areas of rock densely populated by corals and other animals but also areas of open water and sand (one reason I choose to employ a sand substrate in my tanks). Beyond that though I try to make sure my rock work is open so as to not create places where detritus and other things can get caught and build up. This depends also on having an adequate amount of, and properly placed, flow, but in general keeping rock work as open as possible will keep “gunk” suspended in the water column longer giving it a better chance of being filtered out. Fish also seem to like the open rock work. I love to watch my fish zip around the tank, darting in and out of the various caves and nooks and crannies in the rocks.
Lastly is the matter of security. One of the problems in the “olden days” of trying to get huge amounts of rock stacked in a tank, were the inevitable rock slides. At best they caused a few scratches on the glass (or acrylic), and at worst a cracked and/or leaking tank! It’s much easier to stack a smaller amount of rock securely. Personally, I choose to fit my rocks together like a puzzle, placing them in such a way that they support each other securely without the need for additional supports.
Sometimes this means making some minor modifications with a hammer and chisel. Some people choose to epoxy rocks together, but I don’t especially like to turn them into large unwieldy chunks. Another method, which I do like and works well, is to drill holes in the rocks and “string” them together so they are less likely to topple. I’ve seen this done with acrylic rod, but the most ingenious (and cost effective) method I’ve seen is to use those white PVC driveway reflectors (minus the reflector of course). One nice thing about this method (especially in a larger tank) is the ability to create interesting freestanding (i.e. not requiring support against the back of the tank) areas of rock work.
As the old saying goes, a picture is worth a thousand words. So to sum up I offer this shot (top of post) of my 125-gallon reef. The tank has only been setup for a few months so it’s far from a finished product, but it does a fairly good job of illustrating my thoughts about aquascaping.