 This is a story of what can happen when too many compulsive obsessive aquarium keepers gather at a conference, full of ideas and full of support for other outrageous ideas that somehow don’t seem so outrageous at the time. I’m not really sure exactly how I became involved with this particular expedition, but nevertheless, I find myself fully involved and responsible for what went on. I’ve got 750 lbs of rock sitting in my basement right now, 500 lbs for myself, and 250 for another co-conspirator. How did it get here?
I was attending the second day of talks at the AGA conference in California, and during one of the breaks, I walk over to start talking to a group of folks, among who were Ghazanfar Ghori, Jay Luto, Jeff Ludwig, Ed Greenberg, Jeff Senske, and others. Ghazanfar starts talking about this California “gold” that a couple of the local SFBAAPS club put him on to. Apparently, Ghazanfar and crew were at a local member’s home admiring one of their tanks, when they asked the host where the rock featured in their tank came from. The host replies that he bought it from a local rock yard, and would be happy to take them there.
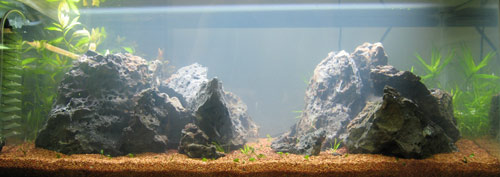
 So, they go to the rock yard, and right next to the rock they were seeking are five pallets of this other amazing rock labeled “mossy porous rock.” The group scouts out a few of the pallets, and manages to exchange some choice pieces from the five pallets, consolidating them into one prime set. Ghazanfar inquires the staff about the cost of the rock, a few local folks purchase a handful of pieces, and they leave the rock yard.
Back at the convention, I meet up with the group, and they tell me their rock adventures, and say that they’re interested in figuring out how to get some back to the East coast. They start seriously talking about the ludicrous idea of shipping a pallet of rock back home. Again, when 2 or more obsessive aquariums meet, no idea is too outrageous, even when it involves shipping 1500 lbs of rock coast-to-coast. Without doubt, I volunteer to go in on the purchase, hoping to first see the rock in person. Luckily, one of the local members, had a few pieces of rock in the trunk of his car. So, we file into the garage, check out the rock, and proceed back to my hotel room to figure out freight.
“Wonderful,” I think to myself, the rock costs 5 times as much to ship as it does just to purchase the pallet. I start thinking rationally for a moment with thoughts like, “how will I ever explain this idea to my wife.” Shortly thereafter, those thoughts turned to, “how can I best explain that this might be my only chance in my lifetime to obtain this rare and Amano-esque rock.” Luckily, she didn’t have an objections, so everything was set. The rock was to arrive at Ghazanfar’s house sometime after Thanksgiving, but we come to find out that a pallet actually weighs 2600 lbs, not the 1500 lbs we originally thought!
 Exactly one week after Thanksgiving, Ghazanfar emails me saying that the rock has arrived, and we arranged to pick it up the following Sunday morning. On Sunday morning, another GWAPA member, Rob, myself, and Ghazanfar start evaluating the rock pile in front of us. Unfortunately, the rock isn’t in nice manageable pieces that you can just throw into an aquarium, let alone lift in some occasions. We were faced with the task of breaking up the rock.
Now, I’ve never been to prison, and don’t plan on trying it out, but in the movies you see hard-time inmates spending their days quarrying and breaking up rock. Let’s just say that I’ve been scared straight by these endeavor. First, we tried using a chisel split the rock. Unfortunately, we probably spent more time trying to dislodge the chisel from the rock, then actually splitting rock with that method. Then, Rob decided to try his incredible hulk method of lifting the rock above his head, and slamming it down on a bed of rocks below. That surprisingly worked pretty well for some pieces, but we found that it had the unfortunate side effect of sending large pieces of rock flying everywhere, including our shins. Yes, that does hurt, a lot! Finally, more out of frustration than anything, we just started wailing at the rock with the sledge hammer itself. Surprisingly (and quite satisfyingly), we started splitting rock at a pretty decent pace this way. After about 4 hours, we finally split the pallet into manageable pieces.
After sorting, and shifting the rock into equal piles for all of our members, we were finally done. Bloody shins, arms, and all, we loaded 750lbs of rock in my little Toyota Corolla, and I headed home. Was all of this worth it? A large box, rubbermaid, and two buckets full, say “hell yeah!”


PS: I fully apologize of for the terribly corny title of this post, but deal with it, okay?

 This is a story of what can happen when too many compulsive obsessive aquarium keepers gather at a conference, full of ideas and full of support for other outrageous ideas that somehow don’t seem so outrageous at the time. I’m not really sure exactly how I became involved with this particular expedition, but nevertheless, I find myself fully involved and responsible for what went on. I’ve got 750 lbs of rock sitting in my basement right now, 500 lbs for myself, and 250 for another co-conspirator. How did it get here?
 So, they go to the rock yard, and right next to the rock they were seeking are five pallets of this other amazing rock labeled “mossy porous rock.” The group scouts out a few of the pallets, and manages to exchange some choice pieces from the five pallets, consolidating them into one prime set. Ghazanfar inquires the staff about the cost of the rock, a few local folks purchase a handful of pieces, and they leave the rock yard.
 Exactly one week after Thanksgiving, Ghazanfar emails me saying that the rock has arrived, and we arranged to pick it up the following Sunday morning. On Sunday morning, another GWAPA member, Rob, myself, and Ghazanfar start evaluating the rock pile in front of us. Unfortunately, the rock isn’t in nice manageable pieces that you can just throw into an aquarium, let alone lift in some occasions. We were faced with the task of breaking up the rock.


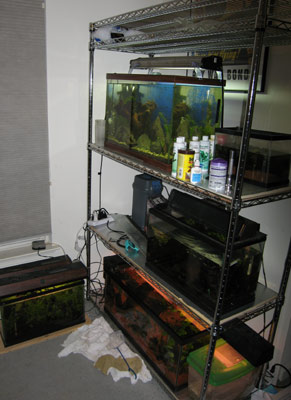 I have been wanting to consolidate some of the tanks in my office for awhile. Previously, I had them on an old bowing bookcase, a wire stand, and the floor. After seeing the current GWAPA president’s tank setup (Aaron), I decided that I wanted the same thing. So, the problem with most of these racks is that the standard ones available in your typical Home Depot or Lowes only support about 200-300lbs per shelf. A standard 20G aquarium weighs about 230lbs filled with water. So, just a single 20G would be pushing the limits.