Walking Thru the Woods

December 30th, 2008

Firstly, I hope everyone had a nice holiday, and continue to enjoy life as we move into 2009. Yesterday, my wife, dogs, and I took a hike through some trails near our house which I have documented several times previously on this site. These trails wind in-between the Little and Middle Patuxent Rivers, with one segment shown below.

Middle Patuxent River

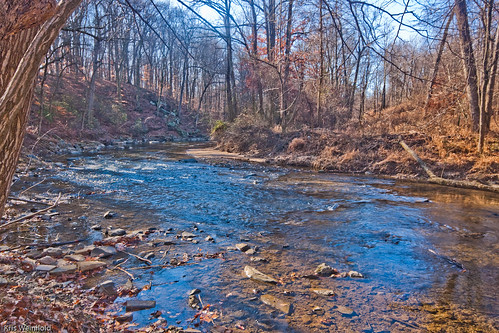
Of course, the weather is far too cold for any aquatic vegetation to be present in the water now, but as you can see the rocky floor of the river is not especially good to support plant life anyhow. I have seen Potamegeton in here previously, however.

Clear Water, Rocky Bottom

With all of the leaves fallen, you could see far more of the forest than normal. While this did make us a little bit more aware of otherwise unseen homes and roads, we also had the opportunity to see some really neat trees that we would have missed at other times of the year.

Neat Tree

And of course, our dogs took full advantage of the more open space, running wild in the few secluded areas that we let them off the lease. Bella, in particular, our black lab and weimaraner mix was racing around too quickly to get a clear picture.

Bella Running Crazy

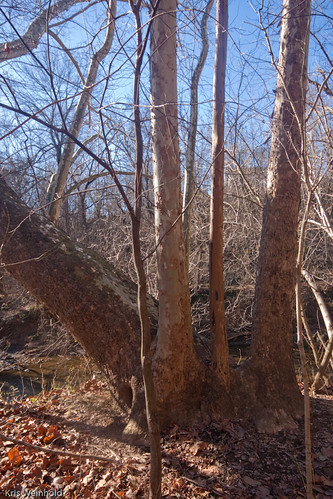
Below is another set of trees that I found particularly interesting. I haven’t a clue whether this could be one of them, but I’m certainly reminded of the old Indian marker trees that are present through Appalachia and surrounding forests.

Neat Tree

Along those same lines, it’s always thoughtful to remember that although some of these wilderness areas look pristine and untouched, that we’re only a part of a long line of people who have walked the land. In this case, old bridge remnants lay moss covered as memories of some old road that passed overhead.

Old Bridge Supports

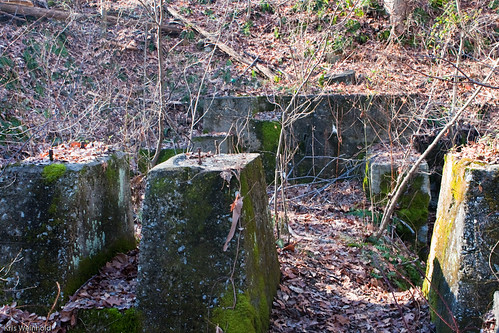
I guess it’s true that eventually, the forest will fully reclaim these structures. All the while, I’ll enjoy walking and exploring the forests and waterways near our house.


Business Broker

75G – 2 Weeks In

December 21st, 2008

I wanted to give an update on my 75G aquarium, roughly two weeks since I rescaped it. As you can tell, many of the stems in the background need a trim, but otherwise, the midground is pretty much intact. I still haven’t decided on a foreground plant, which I really need to do. Right now, I’m kind of thinking of using Echinodorus tenellus var. ‘micro,’ which is a small grassy plant that turns red under intense lighting.

75G - 12-21-2008

The Hottonia palustris is growing really well in the right-background, and is a very unique looking plant. Right now it’s growing tall, and then trailing a little bit toward the front glass as it nears the water surface, which is exactly what I want.

Hottonia palustris

The tank is also packed with about 50-70 Iriatherina werneri (Threadfin rainbowfish), and a few other Melanotaenia praecox (Dwarf Neon rainbowfish) that I had from another tank. While I was taking photos they all congregated in a single area underneath the arch, so it looks like they’re packed far denser then they normally are.

I. werneri & M. praecox

Also, the Proserpinaca palustris (Mermaid weed) that I found locally this past summer is growing nicely, and has turned a nice burgundy color under the lights. This particular variety appears to have extremely fine-tooth leaves, as compared to some of the ones I’ve seen in the hobby. I think I actually prefer this look.

Proserpinaca palustris

Overall, I’m pleased with how this aquascape is turning out. As mentioned, I still need to work on a foreground and trim some of the stems, but otherwise, I’m looking forward to it maturing a little bit more. Comments/critiques welcome as always!

Business Broker

Plants For Sale

December 18th, 2008

Since I maintain a few tanks, it’s fairly common that I end up with more trimmings than I know what to do with. Many of these plants are fairly uncommon in the hobby, and often completely unavailable through regular retail outlets. I sell many of my plants through aquatic plant forums, and to local club members, but I want to make known that many of the plants I talk on this website are available for sale. Since I’m not running a nursery, the availability of any individual plant will vary from time-to-time, so please contact me if you’re looking for something in particular that’s not listed.

More information can be found on my Plants For Sale page in the sidebar, and at the top of this page.

Business Broker

Rotala sp. ‘Araguaia’

December 16th, 2008

Rotala sp. ‘Araguaia’ is one of the plants that my wife brought back for me from Aqua Forest Aquarium in San Francisco, CA.

Rotala sp. 'Araguaia'

It’s one of the nicest new plants I’ve seen enter the hobby in a long time, as it has an oblong leaf shape that turns a pumpkin orange color. In addition, it branches readily, creating a nice bushy effect without too much effort. I haven’t found this plant to be very demanding at all.

It grew in my wormstrate substrate without any additional dosing, besides CO2, but definitely grows faster and a little bit larger in my 50G with high light, CO2, and added fertilizers. I got good coloration in both conditions.

Unlike species like Rotala sp. ‘Green Narrow’, this variety grows vertically, which provides a nice contrast to the aforementioned plant.

Right now, the source of this plant is unknown, despite being named as Araguaia.’We’re in the process of trying to flower and ID it properly, but that can be a long and laborious process.

All in all, I don’t have any complaints about Rotala sp. ‘Araguaia’. Therefore, I can recommend this plant to most people as something different from the more common Rotala rotundifolia. Currently, most stores in the U.S. don’t have it, but it’s available online from hobbyists on sites like aquaticplantcentral.com.

Business Broker

50G – 5 Weeks

December 15th, 2008

It’s been about 5 weeks since I first planted my 50G aquarium, and as you can see the plants are really starting to grow in. In some ways, I’m starting to think that this isn’t a good thing. I’m reconsidering all of the Blyxa japonica on the left side midground, as it just seems too imposing. I need to come up with a shorter plant there. Previously, I had just jammed the B. japonica down into the substrate prior to photos, but that’s not a great solution.

50G - 5 Weeks

The Hemianthus callitrichoides has finally started to spread a little bit in the foreground, so I’m hopeful that it’ll soon really gain some momentum and fill in. I was also able to get some Fissidens fontanus moss from another GWAPA member, which I attached to the large root ball on the left side. The stems, especially the Rotala macrandra ‘green narrow’, are really growing fast right now. The only disappointment to this point is the Hemianthus micranthemoides in the right midground, which is growing more veritical than bushy. I’m also dealing with a little bit of hair algae, which I’m trying to rectify by starting a small dosing regimen of traces, iron, potassium, and Seachem Excel. Largely, I’m pleased with how things are proceeding, but recognise that a few adjustments will be in order. Comments welcome!

Business Broker

Utricularia gibba

December 10th, 2008

I was first introduced to Utricularia gibba at a GWAPA meeting when another member asked the host for a pair of tweezers, and promptly began to remove a few strands from their tank. Utricularia gibba is often mistaken for algae due to its similar appearance, but it is actually a carnivorous plant that survives by trapping tiny microorganisms in its bladders. At least, if you have ever had an algae outbreak, you could take solace that with proper attention, the tank could relatively easily be made algae-free. Unfortunately, if you find Utricularia gibba in your tank, you’re not so fortunate.

Utricularia gibba

This plant thrives in the same conditions that your other plants do, so your only recourse is to manually remove thread after thread with a pair of tweezers. The most common way that a tank becomes infected is when Utricularia gibba hitch-hikes on some other plant that you introduce into your aquarium.

Utricularia gibba Bladders

Utricularia gibba Bladders

From there, it’s just a matter of time before the bladder-ridden threads wind themselves in amongst the stems of your beautiful plants. You may actually wish to have this plant in outdoor water gardens, however, as Utricularia gibba does produce a pretty yellow flower above the surface.

Utricularia gibba Bladder

Utricularia gibba Bladder

Fortunately, I’ve never had a huge problem with this plant. I’ve introduced it to a couple of my tanks in the past, but luckily was able to contain and rectify the situation shortly thereafter. So, keep an eye out for Utricularia gibba whenever you add new plants to your aquarium.

Business Broker

GWAPA: Holiday Potluck!

December 8th, 2008

GWAPA closed 2008 with a holiday potluck at a member’s house in Reston, VA. The club combines the November and December meetings since it’s hard for people to make two meetings during the holiday season. While the meeting was mostly a social, we did conduct a little bit of club business, electing the board of directors for 2009. I will continue on as president of GWAPA next year, so I’ll soon have to buckle down and work with the other board members to assemble a great schedule for the upcoming year.

Michael’s house was a great place to hold our final meeting because he was a basement full of tanks, which we eagerly perused. Michael has been to the Peruvian Amazon a couple times with the same company that I traveled with, and he has actually brought back hundreds of fish that he personally collected there.

Michael's Fishroom

It was great to look through all of the tanks at the wild South American fish, including piranha, pencilfish, cichlids, characins, catfish, and more. He also had some tanks with other species, such as his rainbowfish aquarium below.

Michael's Rainbowfish Tank

Finally, we had a huge auction, which took us over an hour to complete. There were 144 bags of plants, fish, shrimp, etc. in the auction, with variety that rivaled the auction at the AGA Convention last month. It was a nice close to a great year in the club.


Business Broker

75G – New Aquascape!

December 5th, 2008

I guess you could say that the Aquatic Gardener’s Association Convention last month inspired me to work on my tanks. After setting up my 50G, and moving my 40G, it was finally time to rescape my 75G aquarium. I usually don’t do a whole lot of planning prior to starting a new aquascape. Usually, I just pick the materials I want to use, and kind of fit them together, trying different combinations, until something clicks. Well, this time, I decided to try something new.

Hardscape Plannig

The day prior to the rescape, I pulled out my porous mossy rock and African bogwood, and began working on a hardscape on the floor. Eventually, I decided that I wanted an archway, slightly off-center, with piles of rocks around it. Then, the next day, when it was time to rescape, it was simple to transplant the hardscape into the tank.

75G Hardscape

Obviously, once in the aquarium, I made a few adjustments, spreading out the hardscape, and adding a few extra pieces of rocks and wood to fill it out. I also knew that Narrow leaf Java Fern would feature prominently in this aquascape, after receiving a huge amount of it from a very generous GWAPA member. (BB, thank you so much!) Microsorum pteropus is a wonderful plant to use to fill in the gaps between pieces of the hardscape, making the whole thing look like more than a pile of rocks and wood.

Narrow Leaf Java Fern

After quite a bit of planting, I finished the aquascape. A lot of growing needs to happen, and actually, I still need to plant the foreground, but otherwise, I’m pretty happy with how it’s turned out. Of course, I’ve spent a number of hours staring at it, so I’m sure I see things a little bit differently than a fresh set of eyes.

75G - New Aquascape!

So, with that in mind, I’d love to hear your comments and critiques!

Business Broker

40G Moved!

December 3rd, 2008

A few days ago, I finally committed the time to completely tear down my 40G aquarium, and move it from the second floor down to my basement. I had long worried that the weight on the second floor, plus the risk of serious water damage if the tank/equipment ever leaked, was too much of a risk. So, I completely tore down the tank, removing all of the plants, fish, and hardscape. I knew the earthworm casting substrate would be problematic to move, so I did my best to scrape off the top layer of ADA Amazonia, but kept the bottommost worm-poop in the tank.

Bluespotted Sunfish

It’s amazing how something that I can describe in a few sentences above can take so long to implement. It was basically an all-day project, and a two-person job to actually move the tank. Then, after I got it setup, the Amazonia that I scraped off the top was so muddy that it turned the water into something resembling milk. After countless water changes, the water is finally clear, but there’s no aquascape in place. I’m going to use this tank as more of a farming tank to hold my extra plants. The blue-spotted sunfish and killies are still enjoying it as their home, however. I’ll post some picture of the tank itself after I’ve had a chance to fully plant and clean it up a little bit.

Business Broker

Marine Aquascaping by Jnicho

December 1st, 2008

This is something a little bit different, as this post is authored by Jnicho from The Reef Tank Online Community. Jeff has been keeping aquariums for 25 years, and maintains a beautifully aquascaped reef tank. Read more about Jeff’s background here.

My general thoughts on aquascaping are pretty simple and can be summed up in two general categories.  First, less is more.  Second, keep it natural.

Let’s take a more in depth look at these concepts.  First, keeping it natural is pretty cut and dry.  I like for my tanks to mimic the natural environment of their inhabitants.  To each his own I suppose, but you will never find a cheesy sunken ship, Chinese pagoda or no fishing sign in any of my tanks.  Beyond that, in reef aquaria it’s important to use items made of materials naturally found on the reef or in the ocean.  Other materials often have compounds in them that can cause problems or even kill livestock.

For many years in the reef hobby it was believed that you needed 1 ½ – 2 pounds of live rock per gallon of tank size.  If you were going to cram that much rock into most tanks you didn’t have many options on how you could do it.  The generally accepted approach was to build a strong base of larger rocks on the bottom with smaller rocks on top.  In most cases what you ended up with was a solid wall of rocks across the entire width of the aquarium.

Since the rock work was often leaned against the back pane of the tank, this created a sloped look.  It didn’t yield an especially natural look, and especially once you started to place corals on it, it become what I’ve best heard described as “the fruit stand look”.  These days it’s been found that adequate biological filtration can be achieved using far less rock, giving much greater options on how it can be arranged.

As an example my 125-gallon reef tank has no more than 90 pounds of live rock in it, and maintains undetectable levels of the “bad” stuff. Live rock selection is an entire topic of its own so I won’t get too involved with that here, but I would like to point out that light, very porous rock is the key in using a smaller amount.

There are some different approaches to preparing the tank before you start aquascaping depending on whether you have a substrate or a bare bottom, you want to use rock lifts, etc.  I view these more as a choice of husbandry styles; so again, I’m not going to discuss them in depth here.  For what it’s worth, I personally choose a moderately deep bed of fine sand and no type of rock lifts or supports in my own tanks.

So, here is what I view as the benefits of this approach.  First and most simply, I think using less rock looks better and more natural in most cases.  It allows for more natural placement of corals and other livestock, and allows more swimming area for fish.  When placing and arranging rock work in the tank, I look for three things.

  1. Does it look aesthetically pleasing?
  2. Is it open, leaving as much space as possible?
  3. Is it secure?

OK, so item one is pretty straightforward.  When you look at the tank does the rockwork look natural and pleasing to your eye?  One thing I find really helpful when setting up a tank is to look at lots of pictures of other tanks or even pictures of natural reefs.  Save the ones that you think look nice so that you can identify a general trend of what you seem to like. Some people may actually like the “fruit stand” look; others may like the look of a trench, while still others may want to try to create a biotope that recreates a specific part of the reef.

I find that randomness often helps achieve the goal of looking natural.  Use a variety of sizes and shapes of rock. Also create as many open caves and nooks between the rocks as possible (this also tends to make a more natural environment for fish and other animals).  Try to avoid horizontal or vertical lines.  Nature seldom runs in straight lines.  Horizontal “shelves” or “bridges” are a pet peeve of mine.  Under the right circumstances they can look cool.  More often than not they end up looking unnatural, especial if used to display corals as if they were in a store for sale.  Randomness is also important when placing corals.  Varying the amount of space between specimens tends to yield a more natural look.

Item two, keeping it open.  Some of this goes back to looking natural.  Natural reefs are made up of areas of rock densely populated by corals and other animals but also areas of open water and sand (one reason I choose to employ a sand substrate in my tanks).  Beyond that though I try to make sure my rock work is open so as to not create places where detritus and other things can get caught and build up.  This depends also on having an adequate amount of, and properly placed, flow, but in general keeping rock work as open as possible will keep “gunk” suspended in the water column longer giving it a better chance of being filtered out.  Fish also seem to like the open rock work.  I love to watch my fish zip around the tank, darting in and out of the various caves and nooks and crannies in the rocks.

Lastly is the matter of security.  One of the problems in the “olden days” of trying to get huge amounts of rock stacked in a tank, were the inevitable rock slides.  At best they caused a few scratches on the glass (or acrylic), and at worst a cracked and/or leaking tank!  It’s much easier to stack a smaller amount of rock securely.  Personally, I choose to fit my rocks together like a puzzle, placing them in such a way that they support each other securely without the need for additional supports.

Sometimes this means making some minor modifications with a hammer and chisel.  Some people choose to epoxy rocks together, but I don’t especially like to turn them into large unwieldy chunks.  Another method, which I do like and works well, is to drill holes in the rocks and “string” them together so they are less likely to topple.  I’ve seen this done with acrylic rod, but the most ingenious (and cost effective) method I’ve seen is to use those white PVC driveway reflectors (minus the reflector of course).  One nice thing about this method (especially in a larger tank) is the ability to create interesting freestanding (i.e. not requiring support against the back of the tank) areas of rock work.

As the old saying goes, a picture is worth a thousand words.  So to sum up I offer this shot (top of post) of my 125-gallon reef.  The tank has only been setup for a few months so it’s far from a finished product, but it does a fairly good job of illustrating my thoughts about aquascaping.

Business Broker

« Previous Entries