Jewel Cichlids – All Grown Up

January 31st, 2008

Remember back in the summer when I brought home the wild Jewel cichlids from Florida, and they immediately spawned? The fry were so tiny back then.

Jewel Cichlid Male with Fry

Now, only about 6-7 months later, the then fry, are now nearly as large as the adults. What may be even more amazing is that the two parents are living peacefully with their 2 remaining children in a 20H. I gave the other fry away when they were only an inch or two.

Jewel Cichlid

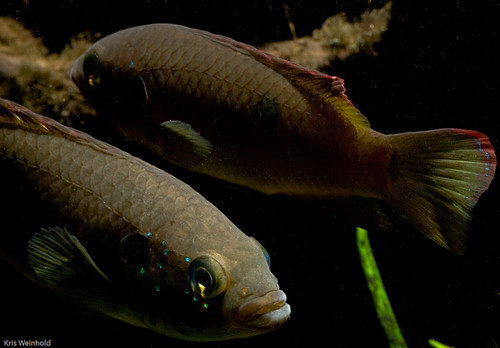
While not quite as large or colorful as their parents, they are starting to look fairly decent. The “jewels” are becoming more visible and intense on their face, and their body is staying a nice dark cobalt color.

Jewel Cichlid

I imagine that they won’t ever look as good as their dominant parents until they move on to a tank of their own. I’m trying to maintain the peace by regularly feeding them large meals of blackworms, spectrum, or the occasional feeder guppy. They’re voracious eaters, but don’t seem to fight each other for food.

Jewel Cichlid

When we went on our short weekend trip for four days, I didn’t line up a special feeding regimen, however, and they didn’t beat each other up, so I must assume that they’ve worked out a living arrangement amongst themselves. Hopefully that’ll last for a long time. I imagine that if they ever spawn again, trouble might result. Until then, they’re a fun, and personable group of fish that seem to recognize me, and watch me from the right corner of the tank, whenever I’m in the room.


Business Broker

Ranalisma rostrata – In a Different Light

January 29th, 2008

I’ve been growing Ranalisma rostrata in my 40G tank as the foreground for some time. When I originally setup my 20H, I decided to also plant it in there. As the 20H progressed, I realized that I had too much light, too little CO2, and too little desire to maintain the tank as I really wanted. Therefore, I removed the 55W PC light from overtop, and replaced it with an ordinary 15W fluorescent light strip. Over the past few months, besides being considerably darker than it was before, I’d noticed a huge change in the form of the Ranalisma rostrata in that tank.

Witness how the grassy plant looks in my 40G. Compact growth, overlapping each other, where each blade is thin and relatively uniform.

Ranalisma rostrata - High Light

In my 20H, the growth is quite different (below), with blades more resembling a sword plant, than grass. The blades are longer and the growth is much slower. I suspect that the plant is sending out broader leaves to try and soak up more light since less is available. The color is also slightly different, with the broader leaves being a bit more pale, with a yellowish tint, where the regular form is a bright green.

Ranalisma rostrata - Low Light

I’m sure that this same phenomenon is present in a wide variety of plants, which is why it’s difficult to say exactly how a plant will grow in another person’s tank. I’m often asked at GWAPA meetings whether a plant is high light or not. In general, I can usually only respond that I’ve only ever grown it in high light, but that they should try it out, and see if it survives in their tank. Now, I can’t even guarantee that it’ll look the same!

Business Broker

GWAPA – January 2008 Meeting

January 27th, 2008

On Saturday, GWAPA kicked off 2008 with its first meeting of the year. Dave had been working for months on getting his basement ready for us to aquascape his newly installed 180G aquarium. Dave is doing a soil-based substrate, using mineralized topsoil with a few added nutrients, as his base. It’s capped with a layer of 3M Color Quartz pebbles.

Dave's 180G aquarium

Of course, the hardscape is made up of our porous mossy rock and manzanita, both from California. Being such a large tank, he’s trying to keep it manageable by using lower maintenance plants, such as crypts, anubias, and java fern. There are some other exotics, such as Pogostemon stellatus and Hygrophilia sp. ‘Low Grow’ as well.

Golden Ratio Demonstration

Prior to scaping, Dave gave a nice presentation about the Golden Ratio, using yarn, strewn across the front of his tank to demonstrate the principle. As you can see, he’s applied the rule of thirds when setting up his hardscape, as well as, using asymmetry in terms of the size and numbers of rocks in each grouping to make the hardscape appealing to the eye.

The hardscape partially planted

We had a huge auction at our meeting this month, as well. I brought the most plants I think I’ve ever brought to a meeting. That’s what happens when there’s almost 2 months in between meetings! My tanks are looking a bit bare right now as a result.

Thanks to Jeff U for the meeting pictures!

Business Broker

Shenandoah Valley Hike

January 24th, 2008

Last weekend, my family spent the long weekend down in the Shenandoah Valley. Instead of skiing, we decided to hike up the mountain, and follow a trail along the mountain ridge. The view from up there was incredible, allowing us to take in the whole resort all at once.

Shenandoah Valley

In addition to a beautiful view, the mountain elements there were very interesting as well. We got to see the winter versions of many of the summertime plants and growths. The trees were covered with mosses and lichens, but instead of maintaining their usual color, they were pale, matching the surrounding snow and winter sky.

Winter Lichens

The trail was completely rock laden, necessitating that we watch our step through the snow to avoid slipping on any hidden rocks below.

Shenandoah Valley

Some greenery managed to show through the ubiquitous snow cover, such as the moss below. There was also some green mountain grass frozen in the snow.

Mossy Snow Rock

As usual, there were many scenes that could easily be inspiration for an aquascape. The rock formations would make a lovely African cichlid rockscape. Can’t you just see the gaps being filled in with anubias, java fern, and bolbitus in the rocks below?

Shenandoah Valley

Speaking of ferns, I’ve always loved finding patches of forest that are covered with wild ferns. We saw a few places like that up on the mountain ridge, but unfortunately, they were all busy weathering the cold. I hope to get back to this trail sometime in warmer weather to see the ferns in their full glory.

Wintery Fern

There were also huge patches of mountain laurel in amongst some sparse pine trees. In combination with the rocks and snow, there were some really nice photo opportunities.

Shenandoah Valley

The mountain laurel still had the remains from some late flower buds or berries. The leaves were still green, and formed nice bushes along the path.

Mountain Berries

The rocks were usually set in relatively straight lines, as if something had slid over top of them in a uniform direction. I’m not sure if this is the case or not, but I suspect that this is exactly what happened with glaciers.

Shenandoah Valley

Finally, some pine cones were still on the trees, which I enjoyed taking pictures of.

Pine Cone

I hope you enjoyed my pictures and tale of our mountain hike. It was quite cold (16F degrees), but we were heavily bundled up, and had a fantastic time.


Business Broker

Luray Caverns Virginia

January 23rd, 2008

We took advantage of the long MLK weekend to venture down to the Shenandoah Valley. On our trip down we stopped at Luray Caverns.

Luray Caverns

Luray Caverns is the largest caverns on the East Coast. It has been privately owned and operated by the same family since its discovery, and used to be a travelers’ destination and railway stop, frequented by visitors all over the globe. Unfortunately, due to private ownership, and a lack of proper preservation methods in place during the early days, the caverns are not completely intact.

Luray Caverns

They used to encourage visitors to break off stalactites to take home as souvenirs. As a result, many of the structures along the corridors are broken off. And then, of course, nature also broke off some huge pieces, such as the multi-ton piece shown above.

Luray Caverns

There are all sorts of structures that formed naturally in the cave. Many of the formations look as if they were handcrafted from plastic, but they reassured us that they with the work of mother nature.

Luray Caverns - Reflecting Pool

Throughout the caverns, many reflecting pools reflect the ceiling, making for some very unique looking illusions, such as the one above. Again, it looks like something from another world.

Luray Caverns - Eggs

One of the things I remembered from the caverns when I visited them as a child was the sunny-side-up eggs. This is another case where they broke off a structure, and the resulting inner core looked like a fried egg, so they added it to their tour.

Luray Caverns - Tower

There are some huge structures underground, such as this enormous tower above. I estimate that it’s probably 5 stories tall, and a very impressive feature of an even larger room.

Luray Caverns - Wishing Pool

Toward the end of the tour, they encourage visitors to toss coinage into their wishing pool. Yes, the pool is green from all of the copper coins. They say that they clean out the pool every year and donate it to charity. Despite painting a somewhat negative view of the Luray Caverns company, I really did enjoy our visit. The shear enormity of the caverns, as well as, the unique structures within make the trip worth it.

Business Broker

Hydrocotle sp.

January 21st, 2008

Back in June 2007, a few GWAPA members went down to Florida to see what kinds of plants/fish we could find for our aquariums. One plant that was absolutely everywhere was a Hydrocotle species that mixed into the grass of people’s lawns, and existed in virtually every roadside ditch we visited. I grabbed a small amount, expecting it to completely take over my tank.

Hydrocotle sp.

I couldn’t have been more wrong. This small plant has been living in my 40G tank for over 6 months, while only throwing up a single new stem. Recently, I upgraded my lighting to a 2x96W setup from AHSupply and I’ve noticed that the Hydrocotle sp. has started to grow, sending up a new stem and leaf in just the last week. Right now, the stems are approximately 6 inches tall, which is slightly taller than I’d prefer them. I’ll be sure to post if it evens out, and becomes a nice accent plant in my aquascape.

Business Broker

Snowy Day

January 18th, 2008

Our area finally got some snow yesterday for only the second time this winter. The temperature barely stayed below freezing, but it allowed for 2-4″ of snow. I got home from work with just enough daylight to spend about 45 minutes photographing spots along the Little Patuxent River near my home.

Snowy Little Patuxent River

I’ve been waiting all season for a good snowfall so that I could come out and take pictures of the river with snow-covered banks, rocks, and vegetation. I figured that I’d be the only one out on the trails, as it was sleeting when I was out there, but surprisingly, I saw joggers, dog walkers, and even a cross-country skier.

Snowy Little Patuxent River

This was a very wet snow, so it stuck to anything and everything. Tree trunks were painted quite nicely with snow like the one below.

Snowy Tree Trunk

When first looking through these pictures, I was taken by how they look like black+white prints. I really didn’t desaturate any of them. The lack of green from the seasonal leaf drop, combined with the contrast of the bright snow to the darker tree limbs yields little color.

Snowy Little Patuxent River

In many places the water seemed to be moving slower than usual, even though it wasn’t frozen hard. I’d like to say that it was like a moving slurpy, but I’d be lying. It’s more like a glass lake.

Snowy Little Patuxent River

That said, some parts still kept their usual ripples and rapids. But, of course, the white precipitation made them even prettier than usual.

Snowy Little Patuxent River

I’ve always enjoyed the first few hours after a good snow because the tree branches are completely coated with white. Then, as squirrels and wind breaks through the limbs, the original luster is lost.

Snowy Branch

I imagine this snow won’t stick around very long, as it’s supposed to get a bit above freezing this weekend. It’s the snow covered rocks in this picture that I really like.

Snowy Little Patuxent River

Here’s a zoomed in shot from the same vantage point. I think I like this one better.

Snowy Little Patuxent River

I hope you enjoyed these pictures, and hopefully if you got snow yesterday, you were able to enjoy it like I did, instead of being frustrated by the inconveniences it can cause.


Business Broker

Patapsco Valley State Park – Winter Quiet

January 16th, 2008

This weekend, my wife and I made went hiking in Patapsco Valley State Park. We’ve been to the park before to see some small waterfalls, but this time that part of the park was closed, so we took to the forest trails. All of the leaves have now fallen, but this allows you to see the landscape better, and for longer distances.

Off into the Wilderness

From a distance, fallen trees in small valleys could easily be inspiration for aquatic hardscape. Even scenes that aren’t very interesting, still have appeal, if just for some awkward bending tree trunks like the ones below. On the trail, besides the occasional mountain biker, it was pretty quiet. We saw a few squirrels, and the occasional woodpecker searching for a hidden meal, but for the most part it was a nice quiet walk through the forest.

Patapsco Valley State Park

After a few miles, we finally came back around to find a cold stream flowing over river rocks. We took a minute to listen to the trickling of the water, and enjoyed the green of the evergreen beside it. I spend a good deal of time trying to create a beautiful underwater landscape to enjoy, that it’s easy to forget that free ones are all around you outside.

Patapsco Valley State Park

We’ve had some unseasonably warm weather in our region recently, but gradually the weather has been turning cooler this week. I know many folks enjoy year-round warm weather, but for me, I enjoy the cold winters, the seasonal change, and the landscape that changes with it.


Business Broker

AHSupply 2x96Watt Canopy Upgrade

January 14th, 2008

On Saturday, I decided to install a new AHSupply 2x96W kit into the canopy over my 40G aquarium. I used to have ODNO lighting on this tank, but I wasn’t comfortable with the amount of energy being wasted to squeeze out a little bit more light from the 36″ 30W bulbs. Below is what that configuration looked like: 4 bulbs driven by 4 ballasts, over cheap shop-light reflectors.

After I removed the existing equipment, I was pretty happy with the condition of the wood. When I built this canopy, I put extra coats of finish to prevent moisture damage. It held up to the moisture and heat pretty well!

I chose to go with AHSupply’s 96W kit because they have fantastic aluminum reflectors, and the 96W bulb fits a 3′ tank perfectly. I know that T5 lighting is all of the rage these days, but I’d prefer to stick with a consistent power compact lineup so that I can buy replacement bulbs in bulk for all of my tanks.

The kit comes with a set of very detailed instructions for installing into a canopy, or building a DIY strip-light enclosure. Everything you need for either configuration is included. To start, I installed the reflectors and bulb clips into the canopy.

The reflectors come with a yellow plastic film over top of them to avoid scratches during installation. They’re a fantastic parabolic reflector that really focuses most of the light output from the bulb down into the tank. They claim that their reflectors make their setup produce 2.5X as much light as a store-bought solution.

Wiring up the ballast was very straight-forward thanks to the included wiring diagram. The hardest part was trimming the wires to length, and stripping them to use the wire nuts. After screwing down the 2 ballasts, and installing the bulbs, I was all done.

Time to fire them up — Man are they bright! It seems like they’re 10X brighter than my old ODNO lights, using equal or less the wattage. By mid-afternoon, the entire tank was pearling more than I’ve seen it pearl in years. This continued for 3 straight days, so I’ve increased my CO2 injection, and dosing amount to compensate. The fish really pop under these lights as well. I’d recommend AHSupply products to anyone looking for a DIY lighting solution.

40G - 1/14/2008

Business Broker

CCA – FryBabies Julie – January 2008

January 12th, 2008

Capital Cichlid AssociationThe Capital Cichlid Association opened the year by bringing in Julie from FryBabies.com to talk about keeping, and breeding, Tropheus cichlids from Lake Tanganyika.

Tropheus are a mouth-brooding cichlid that are fairly common among African cichlid keepers. I, myself, have never kept them, so I found Julie’s talk quite interesting. She imports a lot of fish, making it unpractical to slowly acclimate new imports to her water. So, presuming the pH of the two waters is not terribly different, she simply nets them from the bag, and puts them in her tank. While this may sound alarming, she indicates that she has had zero deaths resulting for this treatment, which is not true for when she slowly acclimated them.

Once in the tank, she withholds feeding them for 3 days to allow their gut to clear of any previous food. Then, watching for some trouble signs (stringy feces), she gradually increases the amount of food she gives them — mostly vegetable-based foods.

Her tanks are generally 50-75G, and she sets them up using rocks/wood to obscure long lines of sight. This helps to lower the aggression level of the males to one another. In addition, she usually stocks at least 20 fish per tank so that no one male beats up on the other fish. The idea is that with that many fish, the aggression will be spread out evenly, resulting in few if any deaths.

When the Tropheus breed, she usually doesn’t strip the eggs from the mouths of the female. In most cases, she allows the parents to raise the fry themselves until the fry are about 1/2″-3/4″ in length. However, if Julie does end up extracting the eggs, she usually waits about 2 weeks until heads and tails are developed and visible in the egg. She has observed that if she does it before this time, the number of fry surviving the move to their own tank decreases. To extract the eggs, she fills an airline tube with water, inserts it into the female’s mouth, and holding the fish upside down, blows on the opposite end of the tube to force water into the female’s mouth. The female usually releases the eggs, but 2-3 tries may be needed to get all of them. A CCA member noted that it’s also possible to just move the female to a small tank of her own, and she’ll usually get stressed, dropping the eggs.

Julie rarely feeds any live foods to her Tropheus, but if she does, she’s sure to follow that feeding with a heavy veggie meal to help push the meat through the fish’s gut. Failure to do this can cause fatal problems with Tropheus due to the length of their intestines, so it’s probably best to stick to a vegetarian diet. Multiple species of Tropheus can be kept in the same tank, but make sure they are different color forms. Even so, if you plan on selling the fry, it’s best to keep each species in their own aquarium. You can, however, keep other types of fish, such as Petrochromis, catfish, and gobies with Tropheus, as long as you ensure that the habitat of the aquarium is appropriate for all species involved.

All-in-all an interesting talk from someone who’s bred her fair share of Tropheus!

Business Broker

« Previous Entries