Swallow Falls State Park

November 18th, 2015

Over the weekend, we visited Swallow Falls State Park in Garrett County Maryland. The park features a wonderful 1.5 mile trail that follows along the Youghiogheny River and Muddy Creek, which are two beautiful white water waterways. It is also one of the few old growth hemlock forests in the area.

Swallow Falls

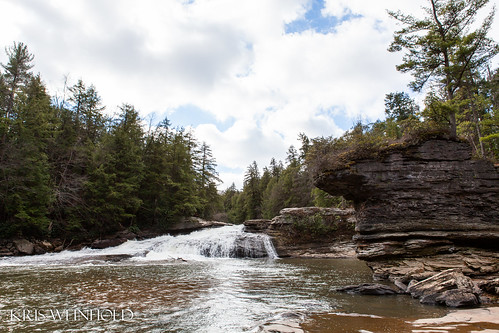
Swallow Falls itself is actually not a huge waterfall. Seen above, it’s a still beautiful, but the rock formation to the right is really the more impressive feature.

Swallow Falls

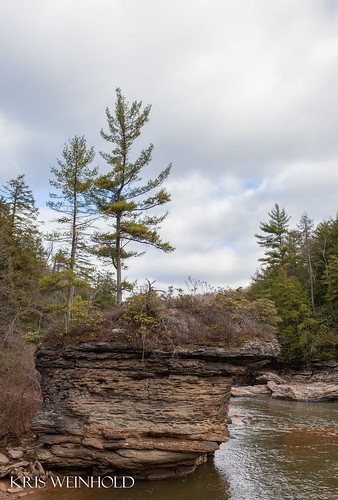
This rock formation reminds me of the sea stacks on the west coast of the U.S. Seen below, it really does stand alone will years of geologic layers of earth and rock visible.

Rock Outcrop

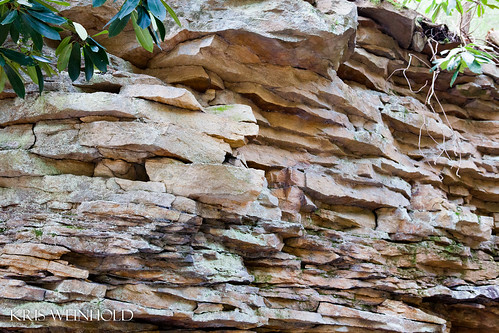
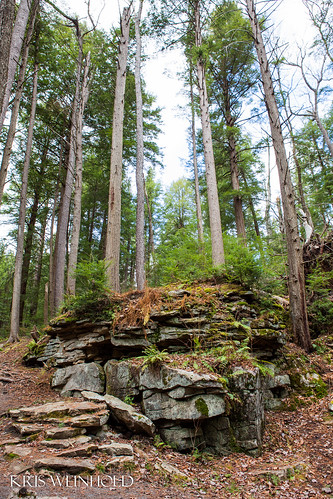
These layers are actually present throughout the park, where huge rocks are haphazardly stack upon one another in layers that resemble many stone walls (or cichlid walls for fish fans) that people put together.

IMG_9924

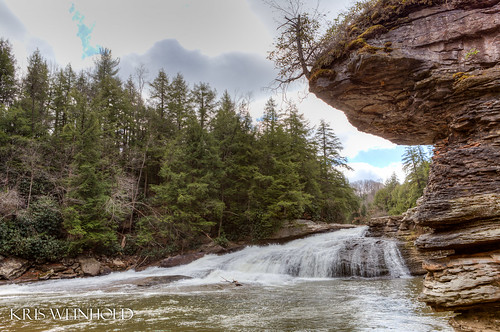
From the top of the falls, there are good views of the river downstream.

Top of Swallow Falls

The trial has beautiful vistas of forest and rock away from the river as well, featuring ferns and moss under the hemlock canopy. Like the sea stack, this reminds me of the Olympic National Forest in Washington, just with less moss and ferns due to vast differences in annual rainfall.

Swallow Falls State Park

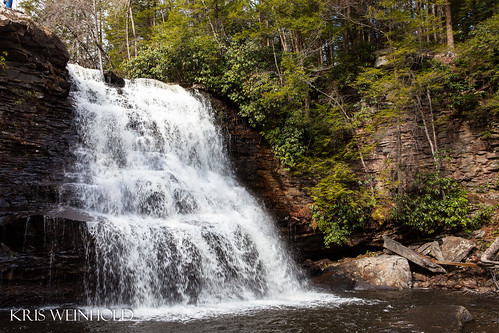
Finally, despite the name of the park featuring Swallow Falls, the largest waterfall in the park (and in Maryland) is on the same trail just upstream from where Muddy Creek and the Youghiogheny River meet. Muddy Falls is impressive, falling 53 feet to a deep lagoon, surrounded by the same massive rock walls.

Muddy Creek Falls

I’d recommend this park highly. It’s not a severely technical or long trail, but there is a lot of beauty and exploration to be had in a small area. Muddy Creek is also handicap accessible via a wooden boardwalk and scenic overlook down on the falls.


Business Broker

It’s a About Perspective…

September 9th, 2015

I did a photoshoot of my 33g this weekend. Normally, I pull out my go-to 24-70mm lens for the majority of my shots, but unfortunately, this weekend that lens was in the shop, necessitating that I experiment with some other options. In doing so, I was amazed at how the exact same aquascape can look radically different based on the focal length of the lens used to shoot it.

33G - 11mm

33G Aquascape – Photographed with 11mm lens

Take the first shot above as an example. This was start with a super wide-angle lens at just 11mm. Of all of the shots, I love how dramatic it makes the hill look, with so much depth it’s amazing. However, if you submitted this to an aquascaping contest, you’d likely get points knocked off for too much distortion. Just look at the silicon line on the back left — it’s not even remotely a straight line like it should be.

33G - 13mm

33G Aquascape – Photographed with 13mm lens

Dialing it back a bit only 2mm to 13mm makes a lot of difference. You can see the distortion is not quite so profound, albeit still present, and the warping of the hill itself is less so. Whether or not this is a good thing or not is up to you.

33G - 17mm

33G Aquascape – Photographed with 17mm lens

Now, jumping to 17mm the lines are much more natural but you still get a good amount of depth. Notice how there’s less and less reflection as the angle gets narrower. In the first shot, you get nearly the entire grouping of Rotala rotundifolia whereas as 17mm we only see the tops.

33G - 50mm

33G Aquascape – Photographed with 50mm lens

Finally, jumping all the way up to 50mm it almost looks like a totally different aquascape compared to the 11mm shot. There’s barely a foreground to speak of and the mound itself is compressed. The lack of depth is profound. This further demonstrates how important the photography aspect of aquascaping to ensure that you’re capturing the right version of the scape that you want to share with the world. I’d be very interested to hear what you’re personal favorite is of the photos above in the comment section.

Business Broker

Lily Flowers Attract

June 5th, 2011

Every spring, one of the things I most anticipate is the blooming of our tiger lilies. These flowers are so fragrant, and so beautiful, that they attract both people and critters alike to them. One of the all-time-favorite photos that I’ve taken happens to revolve around the lily as well (below).

Ant Lily Marching

This year, I decided to go out and take a few more pictures that might complement the above photograph.

Ant on Lily Flower

Fortunately, there’s always lots of ants on the lily flowers, so I didn’t have to wait long before snapping a few pictures.

Ant on Lily Flower

These are all sugar ants, shot with a Canon MP-E 65mm 1X-5X lens at various magnification levels. I was using a twin flash + diffusers to light the critters.

Ant on Lily Flower

I love how macro can open up an entire other world to photograph without having to travel great distances. The picture below looks like it could be taking place on another planet.

Ant on Lily Flower

Now, of course, every good extra-planetary story has to have a villain, so enter the spider mites Homopterans, which unfortunately, are also taking up residence on the lilies.

Spider Mite on Lily Flower

These tiny insects have a cotton poof coming from their rear, that looks like might it be full of eggs.

Spider Mite on Lily Flower

These guys would scurry to the other side of the stamen whenever I tried to get a shot, so I had to do the awkward maneuver of holding the camera in place, while using my other hand to shew the mite back toward the lens.

Spider Mite on Lily Flower

I suppose I ought to try to get rid of these critters to keep them from damaging the plants. Any suggestions on organically killing them?

Spider Mite on Lily Flower

I also found a lightning bug taking shelter at the base of one of the flowers. There seem to be less lightning bugs today than there were when I was growing up, which I’ve read may be due to light pollution at night.

Lightning Bug on Lily Flower

I hope you’ve enjoyed my photographs! In a week or so, the flowers will be gone, and I’ll have to wait until next year to see what critters the lilies attract.

Business Broker

Praying Mantis Pictures

August 4th, 2010

I was out in the garden with the camera this evening and a small praying mantis was crawling over some of the bolting lettuce plants that I still haven’t dug up. I decided to take the opportunity to practice some of my macro photography. I caught the critter cleaning its legs in its mouth, much like my dogs do. I had never noticed the dark eye spot (or perhaps their actual eye) before. The spikes on their forearms look like something straight out of an Alien movie. All shots were using a Canon MP-E 65mm lens.

Praying Mantis

Praying Mantis Praying Mantis

Business Broker

Just Another Bald Eagle…

July 12th, 2010

This morning when I woke up, my wife and I noticed that several dozen bald eagles were outside of our place on the algae flats exposed by the low tide. Several times a day, as the tide comes and goes, a rather large area of land sinks and rises from the water line, which leaves several tidal pools that the birds are interested in. Up until this morning, the most eagles that congregating here was about 5 or 6, but the salmon migration should start very soon, so we surmised that they may have sensed this and were waiting at the creek that flows into the channel here.

Bald Eagle, Juneau, AK

Regardless of there motives, I threw on my boots and headed out the door to try and get close enough to photograph the eagles. I took a wide swinging cautious approach so I wouldn’t startle the birds, and eventually got within 50 feet of this particular eagle. I love the mist in the background, and the brown macroalgae underneath this log. Shortly after taking this photograph, I was navigating the algae and found a particularly soft spot, which left me calf-deep in the mud. Eventually, after removing my boot, I managed to free myself and my footwear, but the birds had flown another 100 feet down the beach. It was time for my morning coffee anyways!

Business Broker

210G Aquascape – More Photos!

January 8th, 2010

Back in September, a fellow GWAPA member, Michael, asked me to come and take pictures of his beautiful 210G aquarium so that he would have something to submit to the AGA competition. I previously blogged about this experience, but at the time, didn’t want to post the pictures until after the AGA competition had been decided. Below are a few more pictures from the shoot:

Michael's 210G Aquarium

The 210G gallon aquarium acts as a room divider between Michael’s living room and dining room so that it is visible from three sides. This provides the unique challenge of making all three sides equally pleasing to look at. The picture above is what Michael considered the “front.” This shot was a lot of fun to take because I was behind the camera holding a flash up in the air toward the ceiling to bounce light from the ceiling into the tank. His wife was holding a hair dryer over-top of the water, creating the ripple effect, and Michael was to the right of tank trying to coax his pet discus to line up in a nice row like you see.

Michael's 210G Aquarium

The “front” side of the aquarium is dominated by a beautiful stand of Nymphea lotus, with a really nice portion of Lagenandra meeboldii ‘pink’ to the left of it. The “back” of the aquarium(above) was much less vibrant in coloration, but still showed tremendous growth in the Cryptocoryne lutea and Blyxa aubertii. I’ve since heard that he has drastically thinned out these plants to provide more space for the discus.

Michael's 210G Aquarium

The full cabinet that the aquarium sits on was custom made, and is very well done. I don’t know how he keeps the white stand looking so nice, but he does. I also really like how he used emersed growing Anubias to obscure drip-tube that provide new water to the tank daily.

Discus

Finally, with quite a few nice discus shots, I couldn’t help myself from trying to get a little bit artsy with one of them. I especially liked the shot above because it reminded me of the pictures I looked at as a child in old black-and-white aquarium books from the library. In any case, I promised that I would share more photos was the AGA released their results, so I wanted to keep good on that word. You can find more technical information about Michael’s aquarium, as well as, the AGA judges’ comments on the Aquatic Gardener’s website.

Business Broker

2.5G – Suggestions Used + Photography

September 2nd, 2008

Two weeks ago, I posted a rather pathetic version of my 2.5G aquascape. I got some great comments from everyone, and have updated the scape in a few areas. It’s amazing the difference that the Blyxa japonica, in particular, makes in this scape in the back left. Otherwise, I added some Anubias barteri var. ‘nana’ and moved all of the Java Fern to the right side of the tank. What do you think?

2.5G - 08-31-2008

I also decided to practice some of my photography skills for this picture. With these smaller tanks, you really have the luxury of being able to flash the heck out of the whole tank evenly, using just a couple of strobes. You can see my setup below. I sat one flash on top of the light fixture pointing upward into a domed piece of computer paper. The dome reflects the flash down the back of the tank, illuminating the white paper background sitting about 3-4 inches behind the aquarium.

Photographing the 2.5G

Then, I have a second strobe suspended, using an improvised snoot to focus the light into the tank, which illuminates the front of the scape, which would normally be shaded by the rocks. Of course, the aquarium light itself provides pretty decent light as well, so these strobes are really just for a bit extra refinement. Any suggestions?

Business Broker

Photographing an Aquarium

May 28th, 2008

Photographing a tankPhotographing your aquarium is not an easy thing to do, as I’m sure anyone who has ever tried has quickly found out. Often times, the fish or plants are blurry, the tank is too dark, there’s a reflection on the glass, or it just doesn’t look like it does when viewing it in person. I certainly don’t have all of the answers, but I’d like to share a few tips that I’ve picked up from other hobbyists/photographers that have helped me take decent pictures of my tanks.

Often, it is best to plan for photographing your tank, then to simply decide that you want to snap a picture. If photographing for an aquascaping competition, this planning might need to start 2 weeks in advance, ensuring that all of your trimmings are timed perfectly, so that on photo day, all of the plants are in their perfect state. I’m not going to cover how to do that, but just rest assured that it’s something to consider.

At the very least, it’s often helpful to have done a water change the day before so that the water quality is very high, and free of particles. Additionally, when doing the water change, make sure you scrape the glass. Prior to shooting, turn off the filter/powerheads/sumps/etc, allowing enough time for any particles in the water to settle. By temporarily disabling circulation, you’re helping to avoid blurry plants that wave in the current. Finally, the name of the game is light; if you have any extra strip lights that you can put over top of your tank temporarily, do this now.

Now that the tank itself is ready, it’s time to focus on the camera side of things. It’s obviously very helpful to have a nicer camera with lots of manual options and high quality lenses, but if you don’t, that’s still okay. The two most important things to remember: 1) Turn off your flash, 2) Use a tripod, or sit the camera on a stool, etc…

Ideally, you want the camera to shoot quickly, so that the fish in your tank will not be blurry. This is where any extra light you put over the tank will help you. I’d recommend trying to shoot at 1/100 seconds, but nothing slower than 1/40. If your camera only shoots in auto-mode, you may have to take what it gives you. In order to achieve the faster shot, I use aperture-priority mode (Av) on my camera, and usually increase the ISO to 400-800 until the speed is what I want. Admittedly, this will produce a slightly grainier picture, but I’d rather that, then have blurred fish trails across the tank. Again, the more light above the tank, the lower the ISO you’ll need to achieve this. Additionally, I’ll lower the F-stop a little bit, but I much prefer to keep it around 5.6 or higher for depth of field, but again, if you have to shoot at F/2.8, you may as well do it, and see how it turns out.

On the tripod, center the camera inline with the center of your aquarium. Then, raise the camera up about 6-8 inches, and angle it down slightly in the front, so that the camera is looking down toward the tank. Through the view finder, you can see that this will make it so the aquarium no longer appears rectangular, but we’ll fix that later. The reason you do this is because it shows a bit more depth of the tank, and provides a more natural viewing angle. Rarely do you ever get down on your knees, and look head on at the aquarium. No, you’re usually standing, and looking from a top-angled view.

Perspective view
Notice how the sides are not vertical.

Now you’re all set. Start shooting, and shoot a lot. You’ll find that the position of the fish makes a big difference to how the overall shot looks, so don’t be afraid to take 100 pictures, waiting for all of the fish to converge in just the right area. Also, as you’re taking pictures, notice whether any of the tops of the plants look overexposed (white). If so, you may want to decrease your ISO, or raise your F-stop, which will result in an overall darker picture, but that’s okay.

Now that you’ve taken you shots, it’s time to do a small amount of post processing. After you’ve selected the picture that looks best to you, we need to correct the issue where the sides are not vertical. In Photoshop, this is easy. Simply select the whole picture (Ctrl-A), go to Edit -> Transform -> Perspective. Now, drag the bottom corners of the picture outward until the sides of the aquarium line up vertically with the edge of the picture. Once you’ve done that, use the crop tool to cut out any extraneous parts of the photo. You can use the Levels/Curves tools to adjust the brightness/exposure of various portions of the photograph. After all of that, you should end up with a decent picture.

75G - May 21, 2008
The same picture with the perspective adjusted in Photoshop.

Business Broker

Photography: Fixing Dirty Glass

November 20th, 2007

Cherry Orig with Dirty GlassPreviously, I posted this picture of a cherry shrimp in my 75G tank. I’m sure many of you noticed that the picture itself wasn’t necessarily the top-quality image. In particular, there are quite a few very distracting spots or blemishes throughout the picture, especially noticeable in the darker areas.

Well, these spots are often caused by dirty glass, either watermarks on the outside of the tank, or algae on the inside. If you really want to take some nice pictures of your tank, always be sure to clean the glass a few hours before shooting. If you do it right before shooting, you’re likely to stir of particles in the water column, which can also result in similar blemishes throughout your picture.

Finally, after you’ve thoroughly cleaned your glass, don’t forget to make sure the most expensive glass, the lens on your camera is also free of dust particles and finger prints.

Now, we all know that even if you clean everything, you may still end up with a spot here or there that you missed. So, how do you get rid of these spots? Photoshop!

Photoshop has a fantastic tool called the “Clone Stamp Tool” that makes this task easy. Simply select the tool from the sidebar, adjust the brush size so that it is just barely larger than the spot itself, and zoom in so you can more easily target the spot. Now, fully encompass the spot with the tool’s circle, and left click. The spot should now be gone. If what it automatically replaced the spot with looks good, you’re done. If not, you can undo it. Then, locate an area near the spot that looks good, and ALT-click on that clean area. Now, left-click back on the spot. It should hopefully look perfect this time.

If you repeat this process over and over again until all the spots are missing, you’ll end up with a much nicer looking picture.

Cherry Shrimp

A few more tips. While you’re looking for more spots to exterminate, it’s sometimes helpful to scroll the picture up/down/left/right to more easily see the spots moving around. Also, be sure to try looking over your photo at various zoom levels so you don’t miss any really big or really small spots.

Business Broker