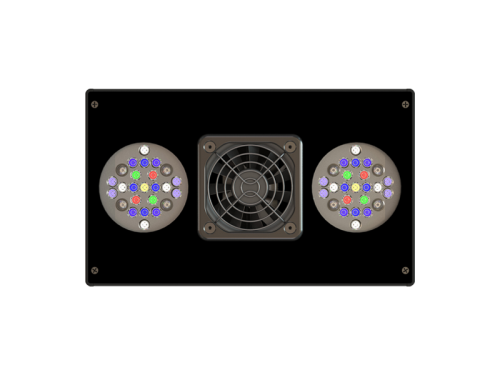
The Ecotech Marine Radion XR30w Pro fixture is one of the top LED lights on the market at the moment. Featuring eight different colors of LEDs across two clusters of 21 high-powered LEDs, the Radion Pro can be configured to output light that’s suitable for any aquarium. Of course, I’m most interested in it’s applicability for a planted aquarium.
Hardware

Out of the box, the fixture comes with a power supply, power cable, instruction manual, mounting hardware, and USB cable. If you want to hang the fixture, Ecotech Marine sells a nice hanging kit separately or rail system if you need multiple units.
As mentioned, the Radion Pro has eight colors of LEDs:
- White: 8 Cree XT-E Cool White (5w each)
- Red: 4 Osram Oslon SSL Hyper Red, 660nm (3w each)
- Yellow: 2 Osram Oslon SSL Yellow, 590nm (3w each)
- Green: 4 Cree XP-E Green, 520nm (3w each)
- Blue: 8 Cree XP-E Blue, 468nm (3w each)
- Royal Blue: 8 Cree XT-E Royal Blue, 442nm (5w each)
- Indigo: 4 SemiLEDs UV, 415nm (2.5w each)
- Ultraviolet: 4 SemiLEDs UV, 405nm (2.5w each)
For planted aquariums, we’re most interested in the white, red, and blue/royal blue LEDs for growing plants, while tweaking the others can help us achieve the right color ratio for aesthetic purposes. Ultimately, while the Radion Pro is capable at outputting 950 PAR at surface, aquatic gardeners will likely use less of that power due to dialing down of some of the more reef-centric colors.
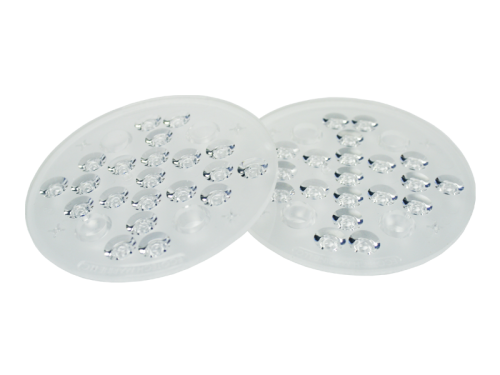
The fixture is equipped with their Total Internal Reflection (TIR) lens, which they claim can boost the peak PAR levels by 45%, or 23% on average. They also sell an alternative wide-angle TIR lens that spreads the light a bit more at the expense of some PAR.
Configuration
Out of the box, the Radion Pro comes with a number of presets that are accessed via the three capacitive touch buttons on the top of the unit. Using these buttons you can increase or decrease the intensity of the light, as well as, cycle through the various lighting presets. Most of the presets are geared toward reef aquariums, but there is one preset that produces nice daylight colors.
However, the key differentiator for the Radion Pro is the EcoSMART Live configuration console. This is where you configure all of the settings for your fixture by hooking the light up to a computer via a USB cable. If this is problematic, they also sell a ReefLink device that will connect the light fixture to your home wireless network, allowing for ease of configuration via smartphone, tablet, or computer any time, any place. I haven’t tried the ReefLink product, so all of my experiences are based on connecting my laptop directly to the light and configuring it via a web browser.
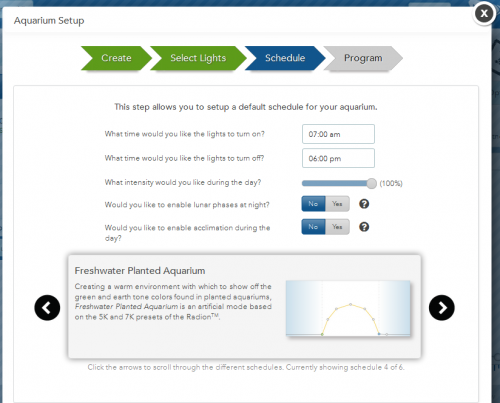
To get started, you need to install their Connection Manager software. Once installed, this is the software that bridges the gap between the web interface and light fixture. It also allows you to update the firmware of your light, do a factory reset, or enable/disable the buttons of the light. When you log into EcoSMART Live, it takes a moment to connect to your light, but then you are asked to setup your aquarium. The setup process lets you configure the location of your lights (if you have multiple), select a default template which includes a planted aquarium option, and define your initial schedule.
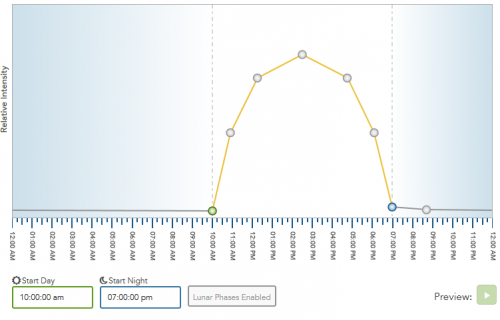
Once the initial setup is complete, you can tweak the default schedule laid out by the template. As you can see in the screenshot above, the planted aquarium default defaults to gradually ramping up the light output, peaking midday, and then dialing down the output until night time.
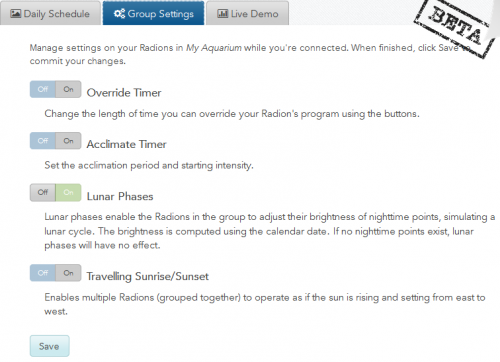
One of the great things about this fixture is that you can specify both daytime and nighttime settings. At nighttime, you can specify your own settings, but you can also have the fixture dynamically adjust the light output based on the actual lunar cycle. I suspect that this functionality could trigger spawning behavior in some fish, as well as, provide a pleasant nighttime viewing experience for us. Clicking on any individual point on the curve lets you define the specific color and intensity of the light output at that time. You can drag the points to adjust the timing, or add additional points for finer grained control.
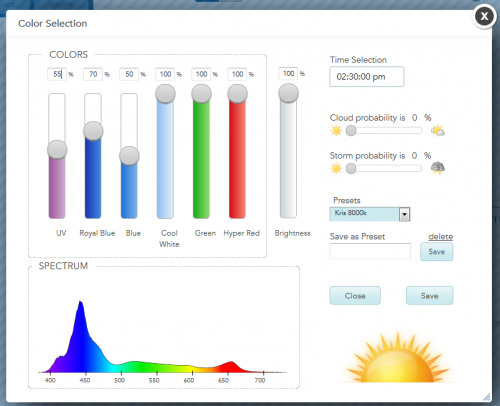
As you can see, you have the ability to adjust all six color channels, and then specify the overall brightness at this point in time. What’s very nice is that the light output changes instantly with every slider change so you can immediately eyeball of the light is what you want. If you find a setting that you like, you can save it as a preset, like I did, so that it can be replicated across the rest of the points. At this point , it looks like you have to manually configure each point with your preset, which I did in a short amount of time, but it would be nice to have a “Apply to All” capability in the future. They did a nice job adding the spectrum graph that changes as you control the individual color channels. In theory, you should be able to find the spectrum graph for your favorite bulb, and replicate it by matching the graph on this configuration screen. Lastly, you can optionally define a chance of clouds/storms at any point in time, which would simulate both natural changes by dimming/bursting light.
It’s important to note that not all of these channels are equal when it comes to PAR output. I have measured the PAR of each channel individually at surface with the fixture mounted 14″ above my tank using the default TIR lenses.
| Color Channel |
PAR at Surface |
Percentage |
| ALL |
483 |
100% |
| UV |
39 |
8% |
| Royal Blue |
159 |
33% |
| Blue |
89 |
18% |
| Cool White |
153 |
32% |
| Green |
22 |
5% |
| Hyper Red |
21 |
4% |
Given that the Royal Blue and Cool White LEDs are both the 5W Cree’s, it’s no surprise to see that those sliders have the biggest impact on overall PAR. The UV, Green, and Red channels have the least, which isn’t surprising given that most plants are green, thus they’re reflecting green light, not absorbing it for photosynthesis. The Blue channel adds a notable amount, but is less powerful than the Royal Blue.
Once finished configuring the schedule, you can do a live-preview of your settings simply by clicking the ‘Preview’ button. This is cycle through the schedule, literally changing the output of the light at each point in time.
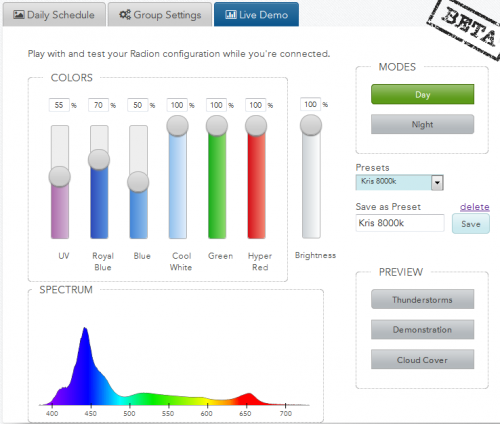
Lastly, the EcoSMART Live portal also has a “Live Demo” section where you can experiment with all of the capabilities of the fixture without affecting your current schedule. This is a great place to play with the different color channels in order to arrive at the right combination before saving it as a preset to use in the schedule. You can also demo the day/night options, various effect modes, or run through the factory demonstration mode that will cycle through everything the light can do.
Experimentation
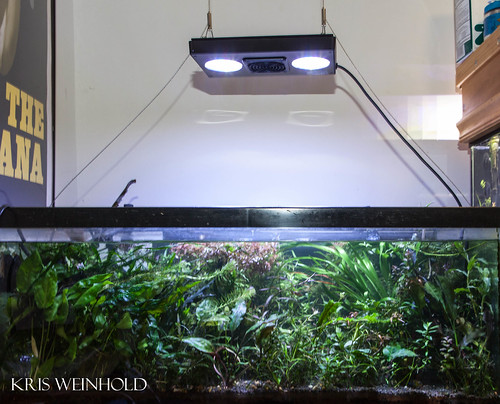
For my experimentation with the Ecotech Marine Radion Pro fixture, I replaced an old Catalina Aquarium 4x39w HOT5 fixture on my 40G farm tank. As you can see, I have a lot of plants in this tank, requiring a light that is very strong that can penetrate through the plant mass to achieve reasonable PAR levels at the bottom of the tank.
I first mounted the Radion Pro 10″ above the surface and swapped in the wide-angle TIR lenses hoping that the proximity to the water surface combined with the wider lenses would produce evenly spread light at a high level. I also started with the Freshwater Planted Aquarium default configuration in the EcoSmart Live setup utility. With this configuration, the PAR directly under the light was pretty good, roughly 350 at the surface and about 100 at the substrate after pulling back the plants for a clear reading. Unfortunately, the spread was very uneven, with the surface PAR in the corners of the tank measuring 60-90, and the substrate much lower. This configuration wasn’t going to work.
I began experimenting with the color channels, increasing both of the blue lights by several factors. I also decided to try putting back in the default TIR lenses and raising the light up another 3-4 inches. My theory was that the default lenses may penetrate the water more effectively, while raising the light up would help my light spread. This is exactly what happened. By altering the color channels, I was able to get the PAR at surface up to 540, with the corners still measuring above 100. At substrate, the spread was roughly 60-200 PAR throughout the tank, more than enough light to grow just about any foreground plant. The intensity is still greatest directly under center, but I can deal with this by keeping my light hogging plants more toward the center of the tank, and the Cryptocoryne and lower light plants to the outer edges. One thing I noticed over the several weeks experimenting with the Radion Pro is that some of my Cryptocoryne melted when I drastically changed the settings, and then grew back fine. The fixture does include an acclimation setting for corals that will gradually ramp up the light output over a period of weeks to allow the coral to adjust to the new lights. Perhaps this may have some use for plants as well?
Conclusion
The configurability of the Ecotech Marine Radion Pro fixture is more advanced than anything I’ve ever used before. They clearly are targeting the high-end hobbyist who demands more bells and whistles, and is willing to play the price for them. Ecotech Marine delivers this marvelously with the Radion Pro! The toolset is easy to use once you get the various configuration pieces configured. I would have liked to have the ReefLink functionality out of the box, as it can be tedious to manually connect the laptop whenever you need to make changes, but realistically, I don’t envision needing to making many adjustments outside of the first few weeks. Clearly, if they added WiFi capability to every fixture, that would only increase the cost. Regardless, I really like the cloud-based configuration concept, as new features and updates can continuously add value to your investment. In addition, Ecotech Marine offers hardware upgrades of their older fixtures to let you replace some of the circuitry to add the latest improvements to your fixture, without having to buy a brand new light.
The clustered design of the fixture creates excellent shimmer effects throughout the tank. The only downside is that you do end up with some harsh shadows and uneven light distribution in the tank. I managed to mitigated this to some extent by adjusting the color channels, hanging height, and lenses used. Since the Radion Pro entered the market targeted at reef keepers, the highest light output levels can only be achieved using more blue light than you might otherwise choose for a planted aquarium. That said, you can still achieve high-light level output that should grow nearly any plant, while still being nice to look at. If you want a high-end light with professional grade features , backed by excellent customer service, that can grow plants, look no further than the Ecotech Marine Radion Pro.
Additional Reading
Radion XR30w Pro Product Page
EcoSMART Live Information
Disclaimer: Ecotech Marine recently sent me this Radion XR30w Pro fixture to review.


![1[1]](http://www.guitarfish.org/wp-content/uploads/2015/04/112-500x304.jpg)
![1[1]](http://www.guitarfish.org/wp-content/uploads/2015/04/11-349x500.jpg)