CO2 Systems

January 30th, 2009

Starting a planted aquarium can seem like a daunting task. Most hobbyists start out small, gradually learning by trial and error what works and what doesn’t, and piece together information from books and websites until they finally either succeed or get frustrated and leave the hobby forever. In this series of posts, I’m going to attempt to outline the most important aspects of setting up a planted aquarium. Hopefully this will become a valuable resource to anyone new to the hobby, or experienced fish-keepers who are looking to setup a planted aquarium.

Carbon is an essential element for plants to grow via photosynthesis. Some carbon will be released from mature substrates through the natural breakdown of detritus and other organic material. Unfortunately, additional supplementation is usually required to provide optimal growth conditions for your plants, especially in high-light tanks. One of the most effective ways to supply carbon to your plants is by injecting Carbon Dixoide (CO2) into your aquarium. There are two main ways of accomplishing this: DIY Yeast CO2 and Pressurized CO2 Systems.

DIY Yeast CO2

Hagen CO2 Natural Plant SystemWhen yeast consumes sugar, one of the byproducts just happens to be Carbon Dioxide. Therefore, using readily available products from your kitchen, it is possible to capture and inject this CO2 directly into your aquarium. Basically, you take a 2L bottle (I recommend rigid bottles like orange juice bottles that won’t compress), drill the cap to insert an airline hose, add a check valve, and run it into your tank. In the tank, you can attach the airline hose to an air-stone or inject it directly into the intake of your filter or powerhead. Personally, for DIY CO2, I prefer Hagen’s ladder style reactor because you can easily see all of the bubbles, and tell when you need to refresh the solution in the bottle. As for the solution, put 2 cups of sugar, 1 tsp baking soda, and 1/2 tsp yeast into the bottle. Fill about 2/3 way with warm water, and shake. In 12-24 hours, a steady stream of CO2 should be flowing from the bottle. Depending on the amount of sugar, temperature, and size of your container, the solution should last for 1-3 weeks, before needing to be replaced. There are a few things to keep in mind with this method:

  1. DIY CO2 is really only appropriate for smaller tanks, approximately 30 gallons and less. It can be done on larger tanks, but you often require multiple bottles running at the same time, which becomes laborious.
  2. Never physically place the bottle above the tank, as the fermented solution is definitely something you do not want in your tank.
  3. Always use a check valve on your airline hose to prevent a backward syphon from emptying tank water into your bottle, or worse, onto your floor.
  4. The bubble stream from DIY CO2 is not constant. You will have a ramp up period and a decline in bubbles, so you should account for this difference when fertilizing.
  5. If you do not want to build the unit yourself, there are commercially available systems, which work very well. Do not be fooled into using their expensive refills, however, as those refills packets are simply baking soda and yeast.
  6. While DIY CO2 is inexpensive to setup, in the long term, sugar, yeast, and baking soda is more expensive and labor intensive to mix then pressurized CO2.

Pressurized CO2 Systems

CO2 Canister & Regulator

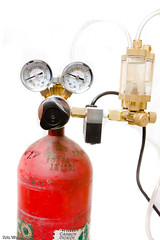
Most hobbyists start with a DIY CO2 setup, and soon grow tired of remixing the yeast/sugar solution every week or two. Fortunately, pressurized CO2 systems eliminate the need for much maintenance, outside of getting the bottle refilled every so often. There are countless different products on the markets surrounding CO2 systems, but in general, all you need is a CO2 tank, a regulator, and needle valve.

CO2 tanks come in a variety of sizes, but the most commonly used sized is the 5 pound tank. As named, this holds 5 pounds of liquid carbon dioxide, which once released, converts back to CO2 gas. For me, a 5 pound tank lasts about 9-12 months on a 75G aquarium. You could get a larger tank to further reduce the frequency of needing a refill, or if you wish to distribute CO2 to multiple aquariums from a single source tank.

The regulator is the piece of equipment that allows you to control the pressure coming out of the tank. Inside of the tank, the pressure is very high, approximately 800psi. In general, you want the output pressure to be between 5-40 psi, and then further reduced through a needle valve. The needle valve allows you to fine tune, getting you down to bubbles per second. Many regulators come with solenoids, which can be hooked up to a timer, so that you don’t waste any CO2 by injecting it at night when the plants are not photosynthesizing. There’s nothing wrong with injecting CO2 24/7, but you’ll likely have to visit the refill store more frequently.

Hooking up the equipment is really simple. Usually, it’s just a matter of using a wrench to screw the regulator onto the tank. Then, open the tank, adjust the regulator to the desired bubble count, and forget about it. In truth, with newly filled tanks, you may need to readjust the knobs a couple times during the first week, before the pressure evens out and stays relatively constant thereafter. If your regulator does not come with a bubble counter attached, you can add an in-line bubble counter to the airline which will let you determine the bubble rate.

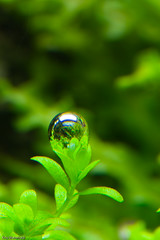
Inside the aquarium, there are countless methods of diffusing CO2. Recently, glass diffusers containing ceramic disks that break up the CO2 into tiny micro-bubbles have become popular. These work well, allow you to easily see whether or not CO2 is being injected into the tank, but do require cleaning to keep the ceramic disks from becoming clogged. (An easy way to clean these diffusers is to raise them above the water surface, fill with hygroden peroxide, and let sit for 20-30 mins before putting them back into the tank.) There are also many different types of reactors that essentially use a pump to diffuse the CO2 into water. I prefer to simply inject the CO2 into a canister filter’s intake line, and allowing the gas to diffuse inside of the canister.

How Much CO2 is Needed?

Hemianthus callitrichoides Oxygen BubbleThe only question left is how much CO2 to inject. With DIY CO2, you don’t have any control over this, but usually the amount of CO2 generated will never reach levels that endanger your fish. With pressurized CO2, it is most definitely possible to inject too much, suffocating your livestock and/or acidifying the water so much that your plants melt. There is a way to approximate the CO2 levels in your tank using pH and KH measurements, using an excellent chart made by Chuck Gadd. As you inject CO2, the pH will drop. By calculating that drop, and knowing your carbonate hardness (KH), you can figure out how many ppm of CO2 are present in your water. Unfortunately, this relationship only holds true if there are no other buffers in the water that could affect the water chemistry.

Personally, I don’t use this measurement to calculate CO2. In general, for each aquarium I usually start at about 1 bubble/second. Then, I watch the tank closely for a day, and see how the fish/plants are doing. If I don’t see any ill-effects, I’ll turn it up slightly, and continue to observe. Usually, I’ll look for the plants to pearl at the end of the day. Pearling is when the water is super-saturated with gas, so the oxygen produced by plants during photosynthesis literally bubbles from the plant. If at any point, I notice any fish swimming wobbily or gasping at the surface, I turn down the CO2. After doing this process, I usually have a pretty good handle on how many bubbles per second I need for each of my aquariums.

There is also another method to determine how much CO2 to add, where you can inject CO2 into your aquarium water. If you measure the pH of that water, you’ll get one reading. Then, let another vile of that water sit out over night. Measure the pH. If the pH raises about 1 degree, then you probably have the CO2 levels about where you want them. If it raises much more, you may want to tone down your CO2. If it hasn’t raised a degree, you can increase the amount of CO2 injected.

There are a few things to note with pressurized CO2 systems.

  1. Regardless of the method, watch your fish. If you ever notice any problems, either do a water change, or temporarily put an air-stone into the aquarium to quickly oxygenate the water.
  2. CO2 tanks are highly pressurized. While they do have safety valves, I highly recommend that you strap the tank to a secure object, such your tank stand. I’ve never had a tank blow on me, but I’ve heard stories of tanks turning into torpedos and busting through walls. Again, this is very, very rare, but precautions should be taken.
  3. Tanks can often be refilled by oxygen suppliers, paintball stores, or commercial beverage shops. Refills usually cost between $10-$15.
  4. Total equipment cost to start up with pressurized CO2 is usually between $150 and $200. There are, of course, more expensive high-end systems. Used systems are a great way to get start on a budget.

Summary

Carbon dioxide is an essential component for plant growth. While pressurized CO2 may seem daunting, it really is the cheapest and most reliable long term solution. There are many different options for accomplishing this, however, but I hope you now have the basis for further investigating those options.


Business Broker

Flow: Filters / Powerheads

January 28th, 2009

Starting a planted aquarium can seem like a daunting task. Most hobbyists start out small, gradually learning by trial and error what works and what doesn’t, and piece together information from books and websites until they finally either succeed or get frustrated and leave the hobby forever. In this series of posts, I’m going to attempt to outline the most important aspects of setting up a planted aquarium. Hopefully this will become a valuable resource to anyone new to the hobby, or experienced fish-keepers who are looking to setup a planted aquarium.

Algae Filled 40G

Algae can set in without adequate flow.

Flow is one of the most important things to consider when setting up a planted aquarium. As plants use up CO2 and nutrients in the surrounding water, adequate flow ensures that fresh water and nutrients are circulated around the plants so that they can continue growing. Without this, your aquarium can have dead zones where algae adventitiously steps in. To prevent this, add filters and powerheads to your aquarium to clean and circulate the water.

Filtration

While filters do provide circulation within an aquarium, they also perform the task of cleaning the water. There are many different types of filters on the market, but some are much better suited for a planted aquarium than others. Since CO2 is an important addition to any planted aquarium, you should ensure that the filter you choose will not work against this addition. Carbon dioxide can easily be driven out of the aquarium through surface ripples created by equipment. Inherently, hang-on-the-back filters such as the very popular Hagen AquaClear series is ill-suited for a planted aquarium for this reason.

Eheim Pro II FilterCanister filters are the ideal filter for a planted aquarium. Not only do they efficiently clean the water due to their ability to easily customize the cleaning medium used (sponges, carbon, bacteria balls, etc…), but their intake and outtake lines can be position well below the water line to prevent surface disturbance. Of course, there are many types of canister filters on the market. I prefer to use filters that will not air-lock when injecting CO2 into their intake, as a means to diffuse the gas into the water column without adding extra CO2 equipment inside of the tank. (A filter with air-locking problems is one where the impeller stalls when a gas is introduced into the impeller chamber.) In addition, most canister filters can easily be hooked up to external heaters, U.V. sterilizers, or other equipment.

Currently, I successfully use several Eheim Pro II series of canister filters on my aquariums. If you do not plan on injecting CO2 into your filter, virtually any canister filter is appropriate. I’m also successfully using the Hagen Fluval series of filters in this way. When purchasing your filter, it’s often better to buy the next model up for your size of aquarium because when a filter is rated for a certain gallon tank, they generally do not take into account that much of that tank will be obstructed by plant mass.

There are other types of filters that are a little bit less appropriate for the planted aquarium. Sponge filters tend to get plants stuck to them, add too much surface agitation, and do not provide any flow. Additionally, undergravel filters should be avoided as they interfere with plant root systems.

Powerheads

Hydor Koralia Powerhead

Once you have decided on your filtration method, you may still discover that certain areas of your aquarium are not receiving adequate flow. In these situations, you could add another filter, but it’s usually much less expensive to simply add a powerhead to the aquarium. Powerheads are designed to move a certain amount of water per hour. I’ve recently started using Hydor’s Koralia Powerhead because the design is extremely energy efficient, produces a wide stream, and doesn’t easily clog. There are, however, less conspicuous powerheads on the market that work very well, such as the Hagen AquaClear series. These also have the added benefit of being able to drive a quick filter, which does a great job at clearing micron-level debris from the water column.

Sumps and Pumps

There are other ways to add circulation to your planted aquarium. While, in general, adding a sump (a large hidden aquarium underneath Supreme Mag-Drive Utility Pumpyour visible aquarium to add overall water volume to your system) is not ideal in planted setups, I have seen it done. The key is to make the path from the main aquarium into the sump as smooth as possible so that CO2 is not lost. The benefit of a sump is that you can put extraneous equipment such as your heater down there. You can also dose fertilizers into the sump, and have them dissolve and subsequently migrate back into your main aquarium. A submersible pump, like the Supreme Mag-Drive Utility Pump moves the water back into the main aquarium. These pumps can also be used externally, in conjunction with PVC pipe or hoses to act as an external powerhead. In this way, I have seen some people create a closed-loop from their aquarium through a DIY CO2 reactor, and then back into their aquarium via an external pump. This setup is advantageous if your canister filter does not have enough horsepower to use an external CO2 reactor without losing too much flow.

Summary

In conclusion, having adequate circulation is extremely important in a planted aquarium. There are a number of ways to achieve this, while also accomplishing some other goals, such as filtration, heating, CO2 injection, etc. Hopefully, you now have the knowledge needed to obtain the right circulation system for your planted aquarium.

Business Broker

GWAPA – January 2009 – Driftwood Collecting

January 26th, 2009

On Saturday, GWAPA had its first meeting of the year at Viktor’s house. Viktor keeps a number of tanks, all of which I believe use a soil-based substrate. This was not the topic of the meeting, however, as Viktor also collects and prepares his own driftwood, which he described his process in detail.

Viktor's 125G

In general, Viktor looks for roots of fallen trees because they’re usually more interesting than many of the upper portions of the tree. Bosemani RainbowfishThen, he soaks the wood outdoors in a friend’s pond for several months to allow it to because waterlogged, and to release some of the tannins. He has used a dishwasher to subsequently sterilize the driftwood, but has more recently shyed away from this practice because he’s wary of the drying chemicals that are often required for newer dishwasher’s drying cycle. So, if it’s a small enough piece, boiling is a good option, and he’s heard that some people even bake their wood. If neither of these is an option, scrubbing it down with hot water is usually the best you can do before putting it in the aquarium. Once in the aquarium, it’s fairly common for a white fungus to appear on the wood. This is nothing to worry about, as it will usually go away on its own, or with the help of a number of algae-eaters, which love the stuff. At this point, the wood should be usuable for years in the aquarium.

Viktor's 75G

After the talk, we continued to mill around, looking at Viktor’s aquariums. He has some gorgeous rainbowfish, including the Melanotaenia boesemani seen above. We conducted our regular monthly auction, which consisted of over a hundred bags of plants and items. I think everyone walked away with something new to try in their tanks. Another great meeting!

Business Broker

Choosing the Right Aquarium

January 23rd, 2009

Starting a planted aquarium can seem like a daunting task. Most hobbyists start out small, gradually learning by trial and error what works and what doesn’t, and piece together information from books and websites until they finally either succeed or get frustrated and leave the hobby forever. In this series of posts, I’m going to attempt to outline the most important aspects of setting up a planted aquarium. Hopefully this will become a valuable resource to anyone new to the hobby, or experienced fish-keepers who are looking to setup a planted aquarium.

2.5G - 08-31-2008

Perhaps an understatement, the actual physical aquarium is very important to a planted aquarium. The dimensions will impact the type of aquascape that you can implement, the design can influence its integration into your room, and the features can determine how equipment will function within the aquarium.

Dimensions

In general, larger aquariums (40+ gallons) are easier to upkeep than smaller aquariums. In addition to having the space to fit all sizes of plants, larger aquariums are not as prone to wild swings in water chemistry. Of course, larger aquariums have higher costs/space requirements than smaller setups, so if these things are issues, try not to start with anything smaller than 10-20 gallons. Nano aquariums are very much in style right now, but they’re more difficult to maintain, so I would recommend that beginners save those for another time.

Once you have selected the general volume of your aquarium, it is important to consider the actual dimensions. While any aquarium can be aquascaped, there are certain dimensions that are especially easy to work with. In general, aquariums with near equal ratios of depth and height are considered great aquascaping tanks. Some excellent aquarium sizes are 20L (30 x 12 x 12), 50G (36 x 18 x 18), and 75G (48 x 18 x 20). There are good reasons for this. For example, a popularly sold aquarium size is the 55G (48 x 13 x 20) tank. While the width and height are nice, the tank is only 13″ deep, making it extremely difficult to fit a complete foreground, midground, and background that transition smoothly between one another. In this case, I’d recommend getting a 75G because the extra 5″ of depth you gain are invaluable when aquascaping. Try to avoid extremely tall tanks, as you may need to purchase more intense (and expensive) lighting to adequately light from top to bottom. That said, I prefer an aquarium at least 16″ tall so that the stem plants have room to grow and branch toward the surface. I consider the perfect planted aquarium, the 50G aquarium, as it is not so wide that it is difficult to provide a coherent aquascape from left to right, and has sufficient depth and height to design a nicely proportioned aquascape.

Design & Stand

Finished AmanoScape at AGA 2008A very important thing to establish up front is whether or not you want your planted aquarium to be a centerpiece that is integrated into the design elements of the rest of the room. Planted aquariums have a potential to really light up a room, and provide that wow factor when people enter. If this is your intention, you may wish to consider a rimless aquarium, which is a tank without the plastic trim along the top and bottom, and without the visible silicon lines along every seam. In addition, the stand that you place your tank on can impact the impression that your planted aquarium conveys. The cheapest possible stand is probably cinder blocks with plywood, which can have a fairly modern look to it. There are a number of nicely finished wood stands available, and I’ve seen some very well done DIY stands using cabinet doors and hardware over-top of a 2×4 support structure. All-in-all, make sure not to look past the design aesthetic of the tank and stand when planning your planted aquarium.

Aquarium Features

There are many different types of aquariums, and while all can be used for planted aquariums, some are more suitable than others. When choosing between an acrylic or glass aquarium, I prefer glass. The reason is that your planted aquarium will inevitably get algae on the glass that will need to be removed. While it’s possible to scratch a glass tank, it’s much easier to do so with acrylic. In addition, the clarity of many of the glass tanks are unsurpassed by acrylic, especially in the corners where distortion is often present. That said, acrylic does have advantages in weight and strength for large aquariums, but if given the choice, I choose glass.

Ghazanfar Ghori’s 215G with Hidden Overflows

Additionally, some aquariums come outfitted with overflows, standpipes, bulkheads, etc… These items are often required if you plumb your aquarium into your house’s drain or water supply, or if you intend to place the tank in the center of your room, and do not want visible hoses or cords on one side of the tank. However, if you do not intend to do any of these things, and you do not plan to use this same aquarium for a reef-tank later in its life, I would recommend avoiding them. These features take up space within the aquarium itself, and are usually not that attractive. This means that when aquascaping you will want to try and cover them up as best you can with tall plants, which could limit your options.

Summary

While it’s possible to simply run out to your local aquarium store and buy whatever aquarium they have in stock, some forethought about the matter is definitely required to ensure a successfully designed planted aquarium. Of course, there are an infinite number of possibilities that could work, but the most common principles have been outlined in this article. Good luck shopping!

Business Broker

Knowing What You Want

January 21st, 2009

Starting a planted aquarium can seem like a daunting task. Most hobbyists start out small, gradually learning by trial and error what works and what doesn’t, and piece together information from books and websites until they finally either succeed or get frustrated and leave the hobby forever. In this series of posts, I’m going to attempt to outline the most important aspects of setting up a planted aquarium. Hopefully this will become a valuable resource to anyone new to the hobby, or experienced fish-keepers who are looking to setup a planted aquarium.

40G - 3.5 Weeks

One of the most important things you can do to ensure a successful planted aquarium should be done before you ever start the project. There are a number of factors that must be determined that will impact the time required to upkeep the aquarium, the cost of your final setup, and type of fish/plants you can keep.

Time spent per week

Hemianthus callitrichoides Oxygen BubbleThere are many different styles of planted aquariums, and some require far more day-to-day effort than others. Upfront, you should determine how much time every week you would like to devote to this hobby. Remember, that in addition to the plants, living creatures will be dependant upon your care, so it’s not fair to them or you if your aquarium goes south due to your inactivity. Realistically decide whether you have 2 hours every week or an hour once a month, or less. Much less than that, and you may wish to reconsider all but the most modest endeavors into the planted aquarium hobby.

The beauty of this hobby, is that often, time spent is rewarded with healthy, hriving plants, and a magnificent aquascape. It is also possible to spend less time, and allow the nature of the plants themselves to grow and develop into more of a jungle aquascape. Obviously, there’s also something in-between.  The types of plants you are attracted to may also help influence this decision. In general, stem plants, or plants that grow vertically from a stalk, usually require more upkeep than plants that are rooted with rosette leaves coming from their base.

Cost

You knew that cost had to enter the equation at some point, right? In general, planted aquariums are fairly expensive, although they do not have to be. If you buy everything new from your local aquarium store, you could easily spend $500-$1,000 for a mid-range setup. Of course, tempering your ambitions, and being willing to buy used equipment, can significantly lower your total expenditure. If you are fortunate enough to have a local aquarium society in your area, this is a great place to acquire equipment, plants, fish, and lots of great advice.  If you are handy, there are plenty of Do-It-Yourself possibilities in the aquarium hobby, which can help save some cash.

Inhabitants

Ancistrus sp. L279The type of fauna that you wish to have in your planted aquarium can go a long way in determining what type of plants you should grow along side them. In general, smaller fish (0″-6″) are the best fish to keep. Much larger, and they can unknowingly uproot plants when swimming by. Fish that dig, eat plants, or rearrange their territory should be avoided in nearly all situations. Do your research and make sure that the 3″ Plecostomus algae-eating catfish at your fish store will not turn into a foot-long beast.

Plants

Finally, you must decide whether you want to be able to grow just about any plant out there, or whether you are willing to trade a more limited plant selection for less upkeep, fertilization, and equipment costs.

Summary

In conclusion, the ideas introduced in this article should be kept in the back of your head when reading future installments of this series. I will further expound upon these topics, introducing all of the complexities of various equipment and techniques, but do not lose sight of what you ultimately want to get out of this hobby.

Business Broker

75G – 1.5 Months

January 19th, 2009

I last posted about the 75G aquarium about a month ago, when it was only setup for 2 weeks. I hadn’t yet decided which foreground plant I was going to go with. After a fair amount of indecisiveness, I was at my local fish store last week, and impulsively bought a pot of Glossostigma elatinoides.

75G - 1/19/2008

This certainly is not a maverick pick, but it’s been awhile since I actually did a tank with good ‘ol glosso, so I thought it would do well. You may notice that in addition to the foreground, I’ve also begrudgingly removed all of the Blyxa japonica from this aquascape. Where I had it previously was just over-powering the foreground a little bit.

Glosso

I also got some Cryptocoryne parva, which I have planted on the edges of hardscape underneath the archway. I’m sure that eventually I’ll have to rescue it from the glosso, but I also added some slightly taller Cryptocoryne willisii, which should stick out.

75G Archway

I have a few other plants in this tank that I’ll likely need to remove to the benefit of aquascape once I have places for them in one of my other aquariums. Mostly, those plants are Lamiaceae sp. and Proserpinaca palustris on the right side of the tank.

Hottonia palustris

The other plants in this tank are all doing quite well. You can see Hottonia palustris pearling in the photo above. Overall, I’m looking forward to finally having the foreground filled in, so that I can just tweak the rest of the plants into a finished aquascape. Comments/critiques welcome as always!

Business Broker

Cherry Shrimp Convention

January 13th, 2009

I was sitting across the room, watching some television, which I noticed a huge mass of cherry shrimp, all congregated in the front of my 75G aquarium. The 75G has been close to algae-free lately, so I have been feeding extra algae wafers for the plecos, but hadn’t really paid much attention after doing so. Apparently, the population of cherry shrimp was quite interested in the algae wafers, and called of their friends to join them in the feast.

Cherry Shrimp

Of course, with that many shrimp in one place, all of the rainbowfish in the tank wanted to see what was so interesting. They dove in and out of the population of shrimp, but didn’t seem to bother the shrimp any by doing so.

Cherry Shrimp

Finally, the Ancistrus sp. ‘L279’ bristle-nosed plecos realized that I dropped in algae wafers, and stormed into the middle of the shrimp. In some instances, they swam in fast enough to a send the shrimp flying out of the way.

Ancistrus sp. L279

All in all, it’s pretty entertaining to watch these critters interact with the rest of the tankmates. As you can tell, the cherry shrimp have had no problem breeding in my 75G aquarium!

Business Broker

CCA – Making Your Own Fish Food – January 2009

January 11th, 2009

The Capital Cichlid Association‘s January meeting kicked off the year with Kurt Johnston describing how he makes his own fish food. Kurt has been in the hobby for over 40 years and is currently the Public Relations Chair, BAP chair, and Swap Meet Chair of the Aquarium Club of Lancaster County. Having a diverse set of interests, he found that making his own food was far more economical, as well as, more nutritious for his fish than the commercial foods available.

He estimates that his recipe costs about 50% less per pound than the average commercial fish food, and even cheaper compared to the premium brands. In addition, there’s no filler ingredients or preservatives that just end up passing through the fish anyways.

IMG_6988-3

To develop his recipe, Kurt spent a lot of time researching the nutritional needs of fish. In general, he found that fish need a highly digestible protein, consisting of roughly 25%-50% of their diet, depending on the species of fish. Their diet should be low-fat, contain 2-5% fiber, and incorporate the full range of vitamins A, B, C, D, E, K, Omega 3&6, and amino acids. In addition, he found that the essential amino acids and long-chain fatty acids are only found in aquatic meats, such as fish meal, not in terrestrial meats like beef. Also, fish can’t digest grains, so it was important to not include them in the recipe.

After knowing what things his food would have to provide, he began looking at ingredients. Kurt uses all natural products, including a variety of vegetables: peas, broccoli, carrots, garlic, etc… For protein, shrimp and a white fish provide that. He also adds protein through a number of freeze-dried powders, such as shrimp powder, krill powder, etc. Then, the whole mess is stabilized with agar, and frozen in sheets that he can break off and feed as needed.

Even though this is a highly nutritious food, Kurt also believes that fish benefit from a varied diet, so he does feed them some premium commercial foods, as well as, live foods in rotation with his own recipe. All in all, I found Kurt’s talk fascinating, and can definitely see the benefits of making your own food.

Update: Kurt was kind enough to allow me to post his full recipe online here: fish food recipe.

Business Broker

Hygrophila sp. ‘Guinea’

January 7th, 2009

Hygrophila sp. ‘Guinea’ is a new plant to the hobby that I’m growing in my 75G aquarium. This particular species of Hygrophila is a larger sized plant, but the leaves are uniquely feathered, so I feel it can be used in spots where other similarly sized plants would be inappropriate. Thus, it should be a very nice plant  to soften and break up the common leaf patterns used in many aquascapes.

Hygrophila sp. 'Guinea'

The plant remains a nice bright green color, even under high light and favorable dosing conditions. Hygrophila sp. ‘Guinea’ is a much slower grower than other plants in the Hygrophila genus, which is a good thing in my opinion. The stem is rather thick, and the leaves all appear to point upward from the stem toward the surface.

Hygrophila sp. 'Guinea'

Hygrophila sp. ‘Guinea’ is still quite rare in the U.S., but it is available occasionally through the hobbyist community. If you can find it, it’s a new plant that’s worth trying.

Business Broker

50G – 2 Months

January 4th, 2009

It’s been about two months since I first setup the aquascape in my 50G aquarium. The plants are growing in very well, and after many hydrogen peroxide treatments, the algae I was experiencing is finally starting to wane. Unfortunately, the H2O2 also took a toll on many of the fish I had in this tank. Otherwise, I’ve removed a few more rocks from the right foreground to allow for more focus on the woodwork there. Ideally, I’d like the wood to look like a fallen tree.

50G - 2 Months

The HC and hairgrass are both starting to take off, which I’ve been waiting awhile for. I’ll probably tweak a few more things, removing a couple plants from the scape, but more/less, I’m pretty pleased with how it’s progressing. As always, comments/critiques welcome!

Business Broker

« Previous Entries