CO2 Systems
January 30th, 2009Starting a planted aquarium can seem like a daunting task. Most hobbyists start out small, gradually learning by trial and error what works and what doesn’t, and piece together information from books and websites until they finally either succeed or get frustrated and leave the hobby forever. In this series of posts, I’m going to attempt to outline the most important aspects of setting up a planted aquarium. Hopefully this will become a valuable resource to anyone new to the hobby, or experienced fish-keepers who are looking to setup a planted aquarium.
Carbon is an essential element for plants to grow via photosynthesis. Some carbon will be released from mature substrates through the natural breakdown of detritus and other organic material. Unfortunately, additional supplementation is usually required to provide optimal growth conditions for your plants, especially in high-light tanks. One of the most effective ways to supply carbon to your plants is by injecting Carbon Dixoide (CO2) into your aquarium. There are two main ways of accomplishing this: DIY Yeast CO2 and Pressurized CO2 Systems.
DIY Yeast CO2
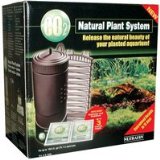
 When yeast consumes sugar, one of the byproducts just happens to be Carbon Dioxide. Therefore, using readily available products from your kitchen, it is possible to capture and inject this CO2 directly into your aquarium. Basically, you take a 2L bottle (I recommend rigid bottles like orange juice bottles that won’t compress), drill the cap to insert an airline hose, add a check valve, and run it into your tank. In the tank, you can attach the airline hose to an air-stone or inject it directly into the intake of your filter or powerhead. Personally, for DIY CO2, I prefer Hagen’s ladder style reactor because you can easily see all of the bubbles, and tell when you need to refresh the solution in the bottle. As for the solution, put 2 cups of sugar, 1 tsp baking soda, and 1/2 tsp yeast into the bottle. Fill about 2/3 way with warm water, and shake. In 12-24 hours, a steady stream of CO2 should be flowing from the bottle. Depending on the amount of sugar, temperature, and size of your container, the solution should last for 1-3 weeks, before needing to be replaced. There are a few things to keep in mind with this method:
- DIY CO2 is really only appropriate for smaller tanks, approximately 30 gallons and less. It can be done on larger tanks, but you often require multiple bottles running at the same time, which becomes laborious.
- Never physically place the bottle above the tank, as the fermented solution is definitely something you do not want in your tank.
- Always use a check valve on your airline hose to prevent a backward syphon from emptying tank water into your bottle, or worse, onto your floor.
- The bubble stream from DIY CO2 is not constant. You will have a ramp up period and a decline in bubbles, so you should account for this difference when fertilizing.
- If you do not want to build the unit yourself, there are commercially available systems, which work very well. Do not be fooled into using their expensive refills, however, as those refills packets are simply baking soda and yeast.
- While DIY CO2 is inexpensive to setup, in the long term, sugar, yeast, and baking soda is more expensive and labor intensive to mix then pressurized CO2.
Pressurized CO2 Systems
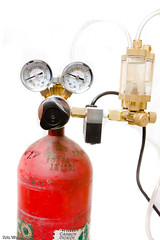
Most hobbyists start with a DIY CO2 setup, and soon grow tired of remixing the yeast/sugar solution every week or two. Fortunately, pressurized CO2 systems eliminate the need for much maintenance, outside of getting the bottle refilled every so often. There are countless different products on the markets surrounding CO2 systems, but in general, all you need is a CO2 tank, a regulator, and needle valve.
CO2 tanks come in a variety of sizes, but the most commonly used sized is the 5 pound tank. As named, this holds 5 pounds of liquid carbon dioxide, which once released, converts back to CO2 gas. For me, a 5 pound tank lasts about 9-12 months on a 75G aquarium. You could get a larger tank to further reduce the frequency of needing a refill, or if you wish to distribute CO2 to multiple aquariums from a single source tank.
The regulator is the piece of equipment that allows you to control the pressure coming out of the tank. Inside of the tank, the pressure is very high, approximately 800psi. In general, you want the output pressure to be between 5-40 psi, and then further reduced through a needle valve. The needle valve allows you to fine tune, getting you down to bubbles per second. Many regulators come with solenoids, which can be hooked up to a timer, so that you don’t waste any CO2 by injecting it at night when the plants are not photosynthesizing. There’s nothing wrong with injecting CO2 24/7, but you’ll likely have to visit the refill store more frequently.
Hooking up the equipment is really simple. Usually, it’s just a matter of using a wrench to screw the regulator onto the tank. Then, open the tank, adjust the regulator to the desired bubble count, and forget about it. In truth, with newly filled tanks, you may need to readjust the knobs a couple times during the first week, before the pressure evens out and stays relatively constant thereafter. If your regulator does not come with a bubble counter attached, you can add an in-line bubble counter to the airline which will let you determine the bubble rate.
Inside the aquarium, there are countless methods of diffusing CO2. Recently, glass diffusers containing ceramic disks that break up the CO2 into tiny micro-bubbles have become popular. These work well, allow you to easily see whether or not CO2 is being injected into the tank, but do require cleaning to keep the ceramic disks from becoming clogged. (An easy way to clean these diffusers is to raise them above the water surface, fill with hygroden peroxide, and let sit for 20-30 mins before putting them back into the tank.) There are also many different types of reactors that essentially use a pump to diffuse the CO2 into water. I prefer to simply inject the CO2 into a canister filter’s intake line, and allowing the gas to diffuse inside of the canister.
How Much CO2 is Needed?
 The only question left is how much CO2 to inject. With DIY CO2, you don’t have any control over this, but usually the amount of CO2 generated will never reach levels that endanger your fish. With pressurized CO2, it is most definitely possible to inject too much, suffocating your livestock and/or acidifying the water so much that your plants melt. There is a way to approximate the CO2 levels in your tank using pH and KH measurements, using an excellent chart made by Chuck Gadd. As you inject CO2, the pH will drop. By calculating that drop, and knowing your carbonate hardness (KH), you can figure out how many ppm of CO2 are present in your water. Unfortunately, this relationship only holds true if there are no other buffers in the water that could affect the water chemistry.
Personally, I don’t use this measurement to calculate CO2. In general, for each aquarium I usually start at about 1 bubble/second. Then, I watch the tank closely for a day, and see how the fish/plants are doing. If I don’t see any ill-effects, I’ll turn it up slightly, and continue to observe. Usually, I’ll look for the plants to pearl at the end of the day. Pearling is when the water is super-saturated with gas, so the oxygen produced by plants during photosynthesis literally bubbles from the plant. If at any point, I notice any fish swimming wobbily or gasping at the surface, I turn down the CO2. After doing this process, I usually have a pretty good handle on how many bubbles per second I need for each of my aquariums.
There is also another method to determine how much CO2 to add, where you can inject CO2 into your aquarium water. If you measure the pH of that water, you’ll get one reading. Then, let another vile of that water sit out over night. Measure the pH. If the pH raises about 1 degree, then you probably have the CO2 levels about where you want them. If it raises much more, you may want to tone down your CO2. If it hasn’t raised a degree, you can increase the amount of CO2 injected.
There are a few things to note with pressurized CO2 systems.
- Regardless of the method, watch your fish. If you ever notice any problems, either do a water change, or temporarily put an air-stone into the aquarium to quickly oxygenate the water.
- CO2 tanks are highly pressurized. While they do have safety valves, I highly recommend that you strap the tank to a secure object, such your tank stand. I’ve never had a tank blow on me, but I’ve heard stories of tanks turning into torpedos and busting through walls. Again, this is very, very rare, but precautions should be taken.
- Tanks can often be refilled by oxygen suppliers, paintball stores, or commercial beverage shops. Refills usually cost between $10-$15.
- Total equipment cost to start up with pressurized CO2 is usually between $150 and $200. There are, of course, more expensive high-end systems. Used systems are a great way to get start on a budget.
Summary
Carbon dioxide is an essential component for plant growth. While pressurized CO2 may seem daunting, it really is the cheapest and most reliable long term solution. There are many different options for accomplishing this, however, but I hope you now have the basis for further investigating those options.

January 31st, 2009 at 2:30 am
very good writeup! I wish this was around when I was first venturing into co2!
January 31st, 2009 at 5:45 am
I really like your posts about the planted aquarium! And they really come in handy for me as I am going to set up my own hi-tech system this year. But can you really inject Co2 24/7? I thought the fish would die as the Co2 is´nt consumed by plants?
January 31st, 2009 at 10:03 am
Thanks for the comments!
Wickberg, yes you can, although I prefer using a solenoid when possible to save CO2. If you are injecting 24/7, you can probably use an overall lower bubble rate because you don’t have the ramp-up period that you do when it’s been off all night. If you need the peace of mind, however, I’ve heard of some people setting a timer to run an airpump through the night, but if you’re doing that, you may as well just get a solenoid for your CO2.
The key, as mentioned, is watching you fish, and ensuring whatever you do, that you’re not stressing them.
June 5th, 2009 at 4:20 pm
[…] 2009 Last Saturday, GWAPA held its May meeting, in which I gave a presentation about Pressurized CO2. The goal of my presentation was to reduce the intimidation factor for those members who […]
September 19th, 2009 at 6:30 pm
i getting ready to start a pressurized co2 in my 75 gall. this seems to cover alot of questions i had but 1 i got a due air pump running 2 bubble wands 1 on the side and i under the spray bar makeing smaller bubbles and spreading them across the tank. do i need to shut down my air pump or can i leave it running when i put the co2 system on the tank
September 19th, 2009 at 7:16 pm
dblzz, great question! When you add CO2 to your planted aquarium, you should turn off anything that greatly disturbs the surface of the water. That would include your bubble wands. This is same principle for why canister filters are better with CO2-enabled aquariums, than the more traditional hang-on-the-back style filters, which break the surface tension when they waterfall back into the tank. Essentially, all of these things help to release the CO2 in your water into the air around the tank. You may be able to compensate for this somewhat by cranking up the CO2, but you may still never be able to achieve the same levels you would without the airstones. Good luck! CO2 is one of the best additions you can add to a planted aquarium, so it’s well worth the tradeoff.